
Barn Door Wall Guide: The Ultimate 2026 Installation Guide
Ready to give your home a modern upgrade? The right barn door wall guide can make all the difference, turning a basic sliding door into a smooth, safe, and stylish feature.
Ever struggled with a door that wobbles or scrapes along the wall? You are not alone. Many homeowners miss out on the benefits of a properly installed barn door wall guide.
This ultimate installation guide takes the guesswork out of the process, whether you are tackling your first DIY project or you are a seasoned pro. You will discover what a barn door wall guide is, why it is essential, how to pick the perfect type, and the exact steps for flawless installation.
By the end, you will know how to troubleshoot common issues and keep your barn door wall guide working perfectly for years. Let us dive in and transform your space together!
What Is a Barn Door Wall Guide and Why Is It Essential?
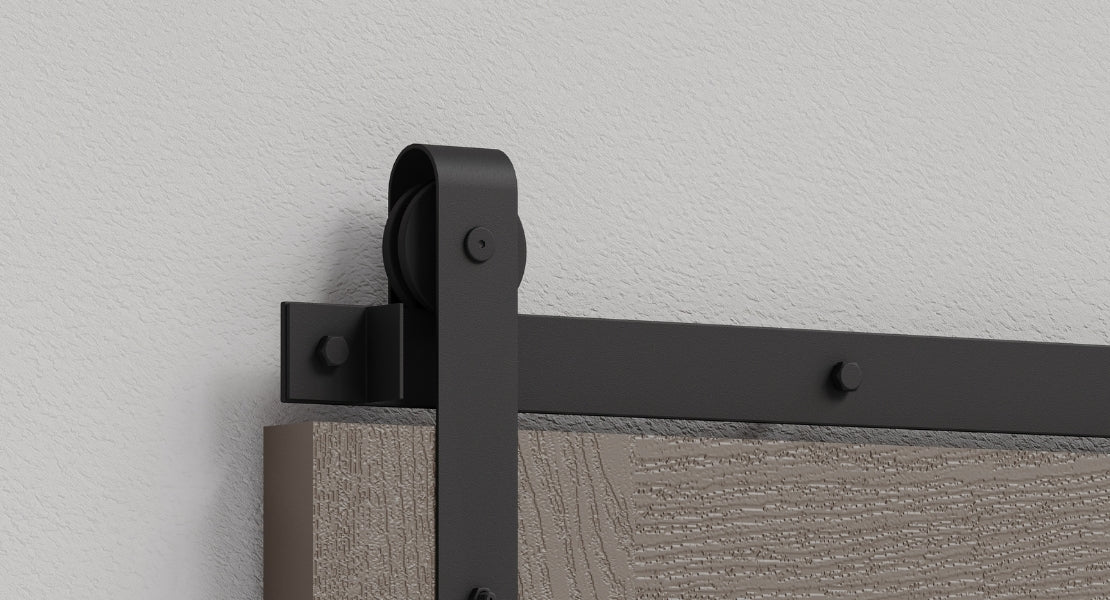
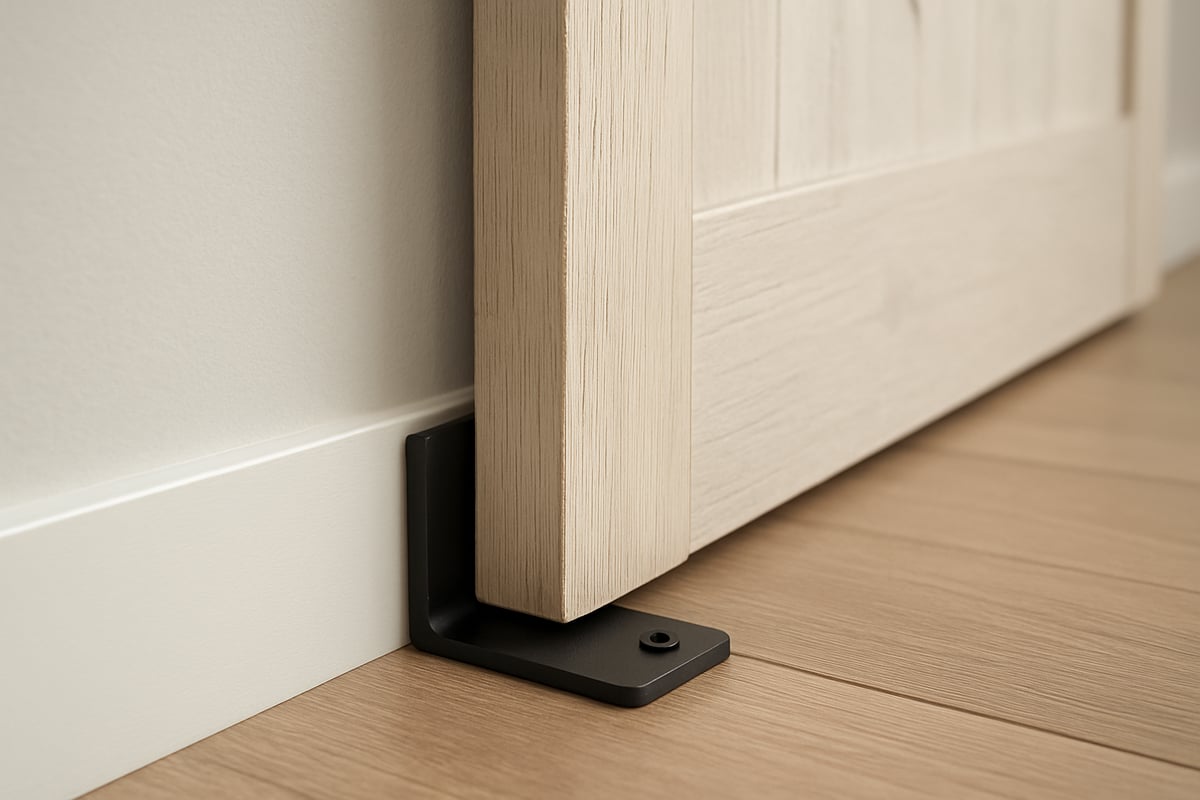
If you’ve ever installed or admired a sliding barn door, you might have wondered what keeps it gliding smoothly and stops it from swinging out and banging against your wall. That’s where a barn door wall guide comes in. This small but mighty piece of hardware is installed at the base of your door, ensuring the panel stays perfectly aligned as it slides open and closed.
A barn door wall guide is designed to prevent the door from wobbling, swinging, or scratching your wall. Without it, even the sturdiest barn doors can drift off track, leading to annoying clunks or even damage. There are two main types: wall-mounted and floor-mounted guides. Wall-mounted guides attach directly to the wall beside your door, while floor-mounted versions anchor into your flooring. The wall-mounted barn door wall guide is especially popular because it doesn’t require drilling into your floors, helping preserve beautiful hardwood or tile surfaces, as highlighted by The Barn Door Hardware Store.
Why does this matter so much? Stability is everything when it comes to sliding doors. If you have kids or pets running around, an unsecured door can quickly become a hazard. A high-quality barn door wall guide keeps the door in a secure path, reducing the risk of accidental bumps or pinched fingers. For more details on safety and how to pick the best guide for your needs, check out the Heavy-Duty Barn Door Safety Guide.
Let’s look at what happens when you skip this essential hardware or install it poorly. You might notice the door scraping the wall, leaving unsightly marks or even causing drywall damage. Doors can also derail from their tracks, creating both a safety risk and a headache for repairs. In high-traffic areas or busy family homes, a missing or loose barn door wall guide can quickly turn a stylish feature into a maintenance problem.
You’ll find barn door wall guides in a variety of materials and finishes. Common choices include sturdy steel, elegant brass, classic matte black, or brushed nickel, so you can match your hardware to your room’s style. These materials are chosen for their durability, ensuring that your barn door wall guide stands up to years of daily use while still looking sharp.
The popularity of wall guides is no surprise. Industry data shows that customers rate their barn door wall guide solutions an impressive 4.9 out of 5, especially praising the easy installation and noticeable improvement in door stability. Whether you’re a DIY enthusiast or a seasoned pro, investing in the right barn door wall guide is the key to a smooth, safe, and stylish sliding door experience.
Types of Barn Door Wall Guides: Features, Pros & Cons
Choosing the right barn door wall guide can make or break your sliding door experience. With so many options available, it helps to know what each type offers and how they fit different needs. Let’s break down the essentials so you can pick the perfect solution for your space.
Overview of Wall Guide Types
There is a barn door wall guide for nearly every door style and installation scenario. Here are the most common types you’ll come across:
- C-guide: A simple fixed guide shaped like the letter C.
- U-guide: Provides a channel for the door to slide through, offering more side-to-side stability.
- Adjustable guide: Lets you modify the width to fit doors of different thicknesses.
- Roller guide: Uses wheels or rollers for a super smooth glide.
- Low-profile or hidden guide: Nearly invisible once installed, perfect for minimalist looks.
Most barn door wall guide options are compatible with various door thicknesses, materials, and home styles.
Detailed Comparison of Wall Guide Types
Each barn door wall guide brings its own set of features, pros, and cons. Here’s a quick comparison to help you decide which might be best for your door:
| Type | Features | Pros | Cons |
|---|---|---|---|
| C-guide | Fixed, simple design | Easy to install, affordable | Less stable for wide doors |
| U-guide | Encloses door edge | High stability, secure fit | May require precise alignment |
| Adjustable | Width can be set | Fits various door sizes | More moving parts to maintain |
| Roller | Built-in wheels/rollers | Smooth, quiet operation | Slightly more complex install |
| Low-profile | Discreet, minimal look | Blends with decor, safe | May not suit thick doors |
A C-guide barn door wall guide is best for standard doors and quick installs. U-guides work well with heavier or thicker doors, offering extra stability. Adjustable guides are ideal if you change doors or want flexibility. Roller guides are perfect for high-traffic areas where smooth, noiseless operation matters. Low-profile guides are great if you want the barn door wall guide to nearly disappear into the background.
Keep in mind that installation complexity and maintenance can vary. For example, a roller barn door wall guide might need occasional lubrication, while a C-guide is virtually maintenance-free.
How to Choose the Right Wall Guide for Your Door
When picking a barn door wall guide, start by measuring your door’s thickness, weight, and clearance from the wall. Make sure the guide you select fits those dimensions and matches your door’s material.
Also, consider the finish and style. Matching the barn door wall guide to your existing hardware (handles, tracks, etc.) brings the whole look together. If you have uneven floors or tight spaces, adjustable or roller guides might be your best bet.
For example, a modern farmhouse setup may benefit from a matte black roller guide, while an industrial loft might look best with brushed nickel or steel finishes. If you need more help choosing, check out detailed breakdowns like the Barn Door Guide Options to explore more features and tips.
Customization is key. Many brands offer barn door wall guide options to suit unique needs, from heavy-duty commercial doors to ultra-minimalist residential installs. Always double-check product specs before you buy, especially if your setup has special requirements.
Tools, Materials, and Preparation Checklist
Getting ready to install your barn door wall guide? The right prep work makes all the difference. Before you start, take a few minutes to gather your tools and materials, and set up your space for a smooth, frustration-free installation. Let’s break it all down step by step.
Essential Tools and Materials
Here’s what you’ll need for a successful barn door wall guide installation:
- Power drill with drill bits suited to your wall type
- Level to ensure perfect alignment
- Measuring tape for precise measurements
- Screwdriver (manual or electric)
- Pencil for marking positions
- Wall anchors and screws (included with most barn door wall guide kits)
- Optional: a backer board if your wall needs extra support
Having all these items within arm’s reach sets you up for success. Double-check that your barn door wall guide and mounting hardware match your door’s weight and thickness.
Preparing Your Space for Installation
Start by measuring your door’s width and the area where you’ll install the barn door wall guide. Accurate measurements help avoid headaches later. Use your level to mark the exact guide placement, making sure it aligns with the bottom of your door and the track above.
Next, scan the wall for any obstacles like baseboards, electrical outlets, or uneven surfaces. You don’t want surprises halfway through. If your floor is delicate, lay down a drop cloth or cardboard to protect it from scratches during the barn door wall guide installation.
Mark the guide’s location lightly with a pencil. This gives you a clear visual reference and helps you avoid mistakes when drilling. Remember, prepping your workspace keeps the process clean, organized, and stress-free.
Safety Considerations and Best Practices
Safety always comes first. Choose wall anchors designed for your wall type—use heavy-duty anchors for drywall, and screw directly into studs for maximum strength. This keeps your barn door wall guide secure and your door stable.
Wear safety goggles and gloves to protect yourself from dust and sharp edges. Double-check all your measurements before you drill, especially if this is your first barn door wall guide project. If you’re unsure about anything, don’t hesitate to consult a professional or review Barn Door FAQ and Installation Tips for expert advice.
DIYers can usually handle the basics, but complex installations or heavy-duty doors may require a pro. Taking these precautions ensures your barn door wall guide is safe, sturdy, and ready for years of smooth operation.
Step-by-Step Installation Guide for Barn Door Wall Guides
Ready to install your barn door wall guide? Let’s walk through each step together, making sure your sliding barn door glides smoothly and securely. Whether you’re a DIY enthusiast or a first-timer, you’ll find this guide straightforward and friendly. If you ever feel stuck, remember, there are plenty of resources out there, including this Barn Door Installation Guide for extra support.
Step 1: Marking Guide Placement
Start by deciding exactly where your barn door wall guide should go. Close your barn door and use a pencil to mark the spot where the guide will keep the door aligned as it moves.
Grab your level and double-check that your mark is perfectly straight. This step is crucial, as alignment ensures your barn door wall guide will perform its job without causing unwanted friction.
If you’re installing more than one guide, measure the spacing carefully. Consistency is key for a professional finish.
Step 2: Pre-Drilling Holes
Next, select the right drill bit for your wall type—drywall, plaster, or masonry will all need different bits. Pre-drilling holes at your marked spots helps prevent cracks or chipping in the wall.
Hold the barn door wall guide in place and mark the screw holes with your pencil. Drill slowly and keep your hand steady to avoid mistakes.
If you’re working with drywall, consider using anchors for extra stability. This small step can make a big difference in how well your barn door wall guide holds up over time.
Step 3: Mounting the Wall Guide
Now it’s time to attach the barn door wall guide with the provided screws and anchors. Position the guide so it sits flush against the floor and wall for maximum stability.
Insert the screws and tighten them with a screwdriver, but don’t overdo it. Over-tightening can strip the holes or warp the guide.
Check that the barn door wall guide is secure by giving it a gentle wiggle. A solid fit means you’re on the right track.
Step 4: Adjusting for Door Thickness and Clearance
If your barn door wall guide is adjustable, now’s the moment to customize it to your door’s thickness. Slide the guide open or closed so it hugs the door without rubbing against it.
Test the door’s movement by sliding it back and forth. There should be just enough space for smooth operation, with no scraping or sticking.
Fine-tune the barn door wall guide as needed, especially if your floor isn’t perfectly level. A quick adjustment now can save you headaches later.
Step 5: Testing Door Operation
With your barn door wall guide in place, fully open and close your door several times. Listen for any odd sounds—creaks, squeaks, or resistance could mean something’s off.
Pay attention to how the door tracks. It should move smoothly, with the barn door wall guide keeping it from swinging out or wobbling.
If everything feels right, you’re almost finished. If not, revisit the previous steps to tweak the alignment or tightness.
Step 6: Final Safety and Aesthetic Checks
Take a moment to inspect your work. Look for sharp edges or exposed screws on the barn door wall guide, which could be hazardous, especially in homes with kids or pets.
Check that the finish of your barn door wall guide matches your existing hardware and overall decor. A cohesive look adds polish to your project.
Finally, tidy up the area, removing dust and debris. A clean workspace makes the results shine and keeps your barn door wall guide looking its best.
Troubleshooting Common Installation Issues
Even with careful planning, issues can pop up. Here’s a quick table to help you diagnose and fix common problems with your barn door wall guide:
| Problem | Possible Cause | Solution |
|---|---|---|
| Door scrapes or binds | Misaligned guide | Adjust guide position |
| Guide feels loose | Weak anchors or screws | Use stronger hardware, re-anchor |
| Incompatible guide | Wrong type for door | Choose correct barn door wall guide |
If you notice the door dragging or the barn door wall guide shifting, don’t panic. Most issues are quick fixes. Take a breath, review your installation, and adjust as needed.
Maintenance, Upgrades, and Long-Term Performance Tips
Looking to keep your barn door wall guide working smoothly for years? Good news—routine care is simple, and a few upgrades can make a huge difference. Let’s break down exactly how to maintain, improve, and future-proof your barn door setup.
Routine Maintenance for Wall Guides
Regular upkeep is the secret to a barn door wall guide that glides effortlessly and stays safe for daily use. Start by inspecting your guide for loose screws or mounting hardware about once a month. Tighten anything that feels wobbly.
Next, wipe down the guide with a soft cloth to clear away dust, pet hair, or debris that can collect over time. For roller guides, a tiny drop of silicone lubricant on the moving parts keeps things running quietly.
Want to avoid common DIY mistakes? Check out Common Barn Door Installation Mistakes, which covers everything from misalignment to hardware slip-ups.
When and How to Upgrade Your Wall Guide
Sometimes, a barn door wall guide just needs an upgrade. How do you know it’s time? Look for these signs:
- Excessive noise when sliding the door
- Visible wear or damage on the guide
- The door feels unstable or wobbly
- Guide no longer matches your decor
If you’re dealing with thicker or heavier doors, consider switching to an adjustable or roller guide for better support. Before you buy, double-check compatibility with your door’s thickness and mounting surface. Swapping out the guide is usually as simple as unscrewing the old one and installing the new, improved model.
Enhancing Barn Door Performance and Longevity
To get the most from your barn door wall guide, pair it with high-quality tracks and rollers. These components work together, making sure your door operates smoothly and quietly.
If your wall is drywall or less sturdy, use a backer board for added support. For heavy-duty or commercial setups, choose robust hardware that can handle extra weight and frequent use.
Here’s a quick table to summarize performance upgrades:
| Upgrade | Benefit |
|---|---|
| Adjustable guide | Fits multiple door sizes |
| Roller guide | Quieter operation |
| Backer board | Extra stability |
| Heavy-duty track | Supports more weight |
A little planning goes a long way for long-term barn door wall guide performance.
Safety and Aesthetic Considerations
Safety always comes first with your barn door wall guide, especially if you have kids or pets. Look for guides with no sharp edges or pinch points, and make sure all screws are flush with the wall or floor.
For style, choose finishes like matte black, brushed nickel, or brass that resist rust and match your other hardware. If you’re updating your decor, swap out the guide for a new finish to keep everything looking cohesive.
By following these tips, your barn door wall guide will not only look great but also keep your space secure and functional for years.
Expert Tips, Design Ideas, and 2026 Trends for Barn Door Wall Guides
Looking for ways to take your barn door wall guide installation from good to flawless? Whether you are a first-time DIYer or a seasoned installer, these expert insights will help you achieve smooth operation, long-lasting durability, and a look that truly elevates your space.
Pro Installation Tips for Flawless Results
Precision is everything when working with a barn door wall guide. Always double-check your measurements before drilling, and use a level to ensure the guide aligns perfectly with the door’s track. For cleaner holes, try marking your drill points with painter’s tape—it helps you avoid messy chips on painted walls.
If your project involves unique wall materials or extra-heavy doors, do not hesitate to call in a professional. They bring experience and specialized tools that can prevent common mistakes, saving you both time and headaches. For more context on getting your sliding door system just right, check out this Sliding Door Track and Hardware Basics guide.
Creative Design and Placement Ideas
A barn door wall guide does not have to be purely functional—it can also add a subtle touch of style. Try mixing hardware finishes, like pairing a black guide with brushed gold handles, to create a modern, eclectic vibe. Minimalist interiors benefit from low-profile or hidden guides that blend seamlessly into the wall.
Placement matters too. For smaller rooms, position the wall guide as close to the baseboard as possible to maximize usable space. In open-concept spaces, use the guide to define boundaries without interrupting the visual flow. Real-world examples include rustic farmhouse kitchens using bold, industrial black guides, or loft apartments opting for sleek, brushed nickel finishes.
2026 Trends in Barn Door Hardware and Wall Guides
The barn door wall guide is set to evolve with fresh trends in 2026. Minimalist, low-profile designs are gaining traction, offering both function and a barely-there look. Homeowners are gravitating toward new finishes like matte black, brushed gold, and even eco-friendly powder coatings that resist corrosion.
Smart home integration is also on the rise. Some barn door wall guide models are being developed to sync with automated door systems, giving you remote control convenience. Expect to see more guides crafted from recycled steel or sustainable materials as eco-conscious design takes center stage. For more inspiration on the latest hardware, explore the Barn Door Hardware Kits Overview.
Frequently Asked Questions About Wall Guides
Can I install a barn door wall guide without drilling into the floor?
Yes, wall-mounted guides allow you to avoid floor drilling, protecting your flooring.
How do I choose the right size barn door wall guide?
Measure your door’s thickness and compare it to the guide’s specifications for a snug fit.
Are barn door wall guide options compatible with all door types?
Most guides fit standard doors, but always check for compatibility with your door’s thickness and material.
What maintenance does a barn door wall guide require?
Regularly check for loose screws and clean away dust to keep everything running smoothly.
The Barn Door Hardware Store: Your Trusted Source for Barn Door Wall Guides
Looking for a reliable place to buy your next barn door wall guide? The Barn Door Hardware Store has become a top destination for homeowners, DIYers, and professionals who want smooth, secure, and stylish sliding doors.

Since 2016, this store has helped over 25,000 customers transform their spaces. Their selection covers every barn door wall guide style you could need, from wall-mounted and floor-mounted to adjustable and roller options. No matter your door’s thickness or style, they have a solution that fits.
One of the biggest advantages of shopping here is the peace of mind you get. Every barn door wall guide comes with a limited lifetime warranty and free continental US shipping. Their expert team is always ready to answer questions, offer advice, and make sure your installation goes smoothly.
Customers consistently rate their barn door wall guide products 4.9 out of 5 for durability and easy installation. Whether you’re a first-time DIYer or a seasoned contractor, you’ll find guides and accessories that make your project stress-free.
Ready to upgrade your barn door setup? Explore The Barn Door Hardware Store’s full range of wall guides and hardware to achieve a flawless, professional finish in your home.
Ready to put everything you’ve learned into action and transform your space with a barn door that glides perfectly every time You don’t have to tackle this project alone—since 2016 I’ve seen so many people (myself included) get the best results when they start with the right hardware and a little expert help. If you want reliable, stylish wall guides and all the accessories you’ll need for a smooth installation, you should definitely check out The Barn Door Hardware Store Their team has your back with durable products, free shipping, and friendly support—making your barn door project a total breeze.