Are you noticing how sliding doors are everywhere in 2026 home makeovers? The sliding door with kit trend is booming, giving homeowners a sleek way to transform spaces without hassle. If you want your renovation to look seamless and modern, you’re in the right place.
This guide walks you through everything you need to know, from picking the right kit to expert installation tips. Imagine a stylish, functional space that’s easy to achieve. Ready to upgrade? Let’s dive in and make your sliding door with kit project a success.
Understanding Sliding Door Kits: Components & Types
If you’ve been eyeing a modern renovation, chances are you’ve come across the term sliding door with kit. But what does that actually mean? In 2026, these all-in-one kits make it easier than ever to transform your space with style and convenience. Instead of piecing together separate parts, a sliding door with kit bundles everything you need for a streamlined installation.

Let’s break down what you get in a typical sliding door with kit. The essentials are the door slab, a sturdy track, rollers for smooth movement, a floor guide to keep things aligned, handles or pulls, and all the mounting hardware. Some kits even include soft-close mechanisms for a high-end feel. This means you can avoid the hassle of hunting down individual parts, saving time and reducing installation headaches.
When it comes to types, there’s more variety than you might expect. The most common is the single sliding door with kit, perfect for tight spaces or standard doorways. Double kits are great for wide openings, like room dividers or grand entrances. Bypass kits let two doors slide past each other, making them ideal for areas with limited wall space. Bi-fold kits fold accordion-style and work well for closets or pantries.
Here’s a quick comparison to help you visualize the options:
| Kit Type | Best For | Wall Space Needed | Example Finish |
|---|---|---|---|
| Single | Bedrooms, bathrooms | 1x door width | Matte black, natural wood |
| Double | Wide openings, living rooms | 2x door width | Brushed nickel, glass panels |
| Bypass | Closets, laundry rooms | Door width only | Carbon steel, rustic wood |
| Bi-fold | Pantries, small closets | Minimal | White, oak veneer |
Material choice is another big decision when selecting your sliding door with kit. Wood offers a classic, warm look and is easy to customize, but it can be heavier. Glass delivers a sleek, modern aesthetic and lets in natural light, although it requires more careful handling. Metal options, like steel or aluminum, provide industrial vibes and are built for durability, but might not suit every decor. Some kits even blend materials for a unique statement.
Another major factor is finish. Pre-finished kits come ready to install, saving you time and effort, while unfinished kits let you paint or stain the door for a truly custom touch. If you love DIY or want your door to match existing trim, unfinished is the way to go. For those who prefer instant gratification, hand-finished doors with preserved woodgrain are increasingly popular.
Compatibility matters too. Most sliding door with kit options are available in standard heights like 80”, 84”, and 96”, but you’ll also find custom sizes for unique spaces. Make sure to check wall requirements, especially if you have tricky trim, outlets, or vents nearby. Ceiling-mounted kits are trending for a cleaner look and work well in modern interiors.
Design-wise, there’s something for everyone. Classic barn door kits remain a favorite for rustic spaces, while minimalist glass designs are on the rise for contemporary homes. Eco-friendly materials and hardware with a subtle, minimalist profile are leading trends for 2026. If you want to explore a variety of styles and finishes, you can browse a complete barn door kits selection to get inspired and find the perfect fit for your project.
With so many options, the right sliding door with kit can truly elevate your home’s style and function. Whether you’re drawn to bold black carbon steel, brushed nickel hardware, or sustainable materials, there’s a kit designed for your vision.
Planning Your Sliding Door Installation: Measurements & Prep
Thinking about installing a sliding door with kit in your home? Smart move! The planning phase is where your project’s success really begins. Let’s walk through how to assess your space, choose the best kit, and get your tools and area ready for a smooth installation.
Assessing Your Space
First things first, you need to size up your space for a sliding door with kit. Start by measuring the doorway’s width and height. Don’t forget to check your wall clearance on both sides—ideally, you want at least twice the width of the door for it to glide open fully.
Look for any obstacles, like light switches, outlets, trim, or vents that could get in the way of your sliding door with kit. Ceiling height is also important, especially for those extra-tall kits in competitor catalogs, like 80, 84, or 96 inch doors.
Check if the wall above your opening can handle the weight. If you’re mounting a heavy door, make sure there are studs or solid support—no one wants a wobbly installation. Common applications for a sliding door with kit include closets, pantries, bedrooms, and home offices. If you’re dealing with a tall entry frame or a standard opening, double-check your measurements so your kit fits perfectly.
Choosing the Right Kit for Your Needs
Now, let’s talk about picking the right sliding door with kit for your space. Think about your use-case: do you need a single door for a tight spot, or a double for a wide opening? Bypass kits are great if you have limited wall space since the doors slide past each other.
Style matters too. Are you going for a rustic vibe, a sleek modern look, or maybe something industrial? Choose your finish—unfinished kits are perfect if you want to paint or stain, while hand-finished options are ready to install out of the box.
Compare hardware finishes in the table below:
| Hardware Finish | Best For | Look |
|---|---|---|
| Black | Farmhouse, Rustic | Bold, Statement |
| Brushed Nickel | Modern, Minimal | Sleek, Subtle |
For example, a bypass sliding door with kit is ideal for laundry rooms, while non-bypass options are a classic fit for traditional layouts.
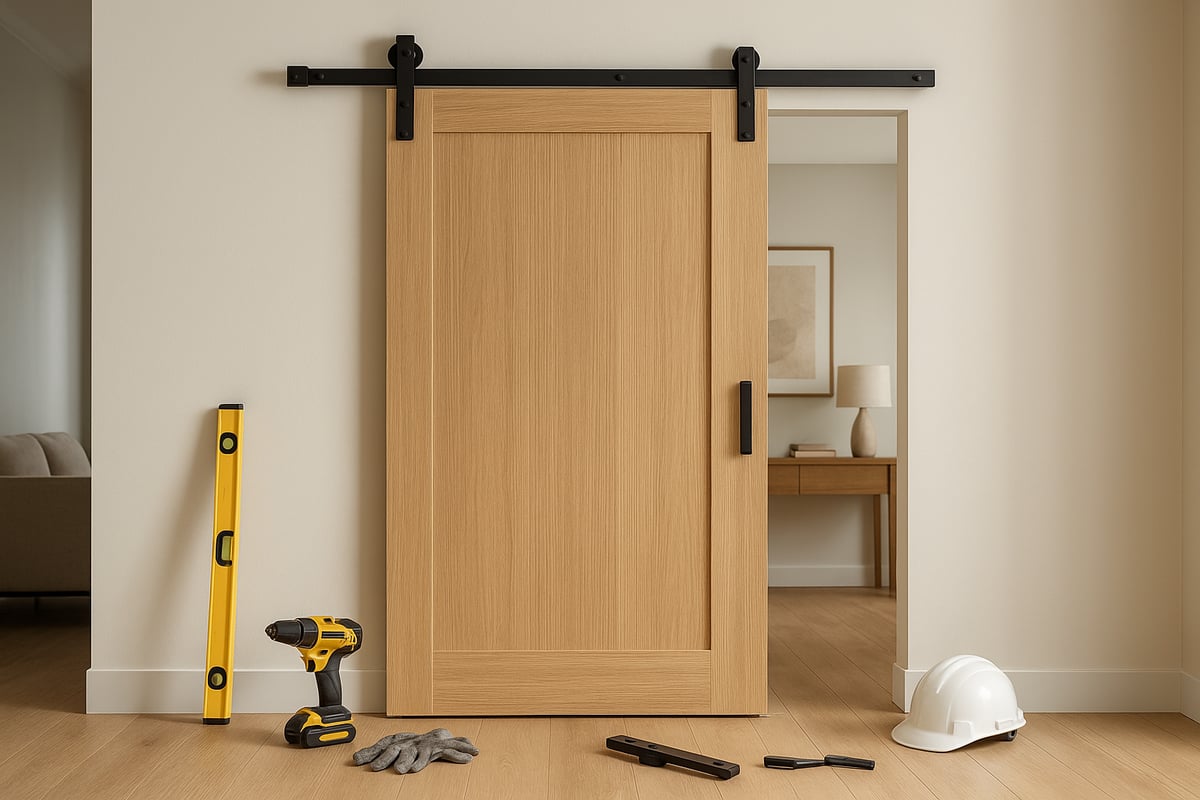
Gathering Tools & Preparing the Area
Ready to begin? Let’s make sure you have everything you need for your sliding door with kit installation. Grab these essentials:
- Drill
- Level
- Tape measure
- Stud finder
- Wrench
- Screwdriver
Prep your area by clearing out furniture and protecting your floors. Remove any old doors and sweep the workspace so nothing gets in your way. Safety is key—wear gloves and eye protection before you start handling hardware.
Lay out all kit components and check the instructions. Organizing each piece of your sliding door with kit ahead of time saves you major headaches later. Many DIY kits come with pre-drilled holes and detailed guides to make things easier.
If you want a step-by-step visual walkthrough, check out this Sliding Door Installation Guide for extra tips before you start. With the right prep, your sliding door with kit will come together smoothly and look fantastic in your space.
Step-by-Step Guide: Installing a Sliding Door with Kit
Ready to transform your space with a sliding door with kit? Let’s break down the installation into simple, manageable steps. Whether you’re a seasoned DIYer or a first-timer, you’ll find this process easier than you might expect. Grab your tools, clear your workspace, and let’s get started.
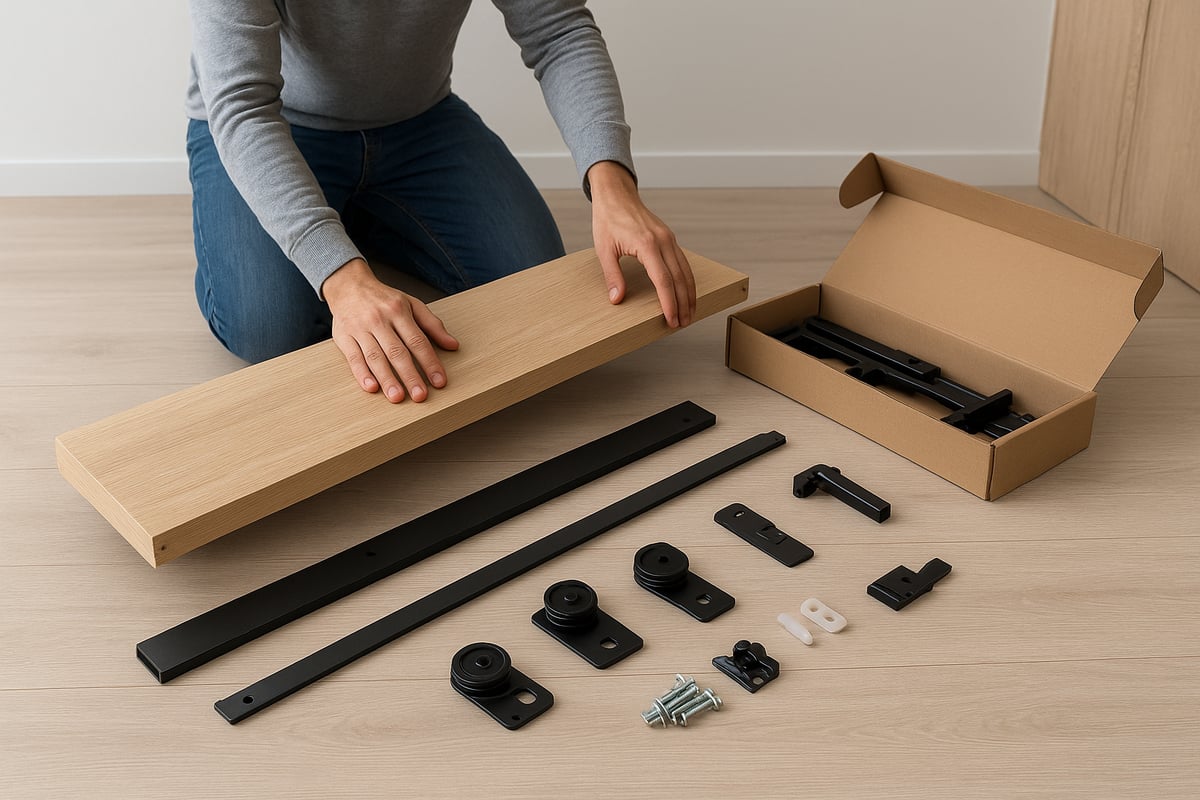
Step 1: Unpacking & Inspecting Kit Components
The first step in installing your sliding door with kit is making sure you have everything you need. Open the box carefully and lay out all the parts on a flat, clean surface. You should find:
- Door slab
- Track
- Rollers
- Floor guides
- Handles or pulls
- Screws, anchors, and mounting hardware
Go through each item and check for any damage or missing pieces. If anything’s not right, don’t move forward until the issue is resolved. Organizing your components now prevents headaches later.
Lay out the parts in the order you’ll use them. This creates a logical flow, making the installation smoother. If you want extra guidance or visual references, check out this Sliding door hardware installation guide for more detailed instructions.
A quick tip: many sliding door with kit options have pre-drilled holes to make assembly even more straightforward.
Step 2: Marking and Mounting the Track
Now that your sliding door with kit is ready, it’s time to mark where your track will go. Use a tape measure to find the right spot above your doorway. Make sure the track is level—nothing ruins a smooth slide like a crooked mount.
Next, locate the wall studs for secure anchoring. Mark the spots for your screws. Drill pilot holes where you marked, which helps prevent splitting and makes the job easier.
Hold the track in place and attach it using the supplied hardware. Double-check everything is straight with a level before fully tightening the screws. For double doors or heavy-duty sliding door with kit installations, ensure the track can support the extra weight.
Once mounted, give the track a gentle tug to confirm it’s solid. This step is crucial for long-term durability.
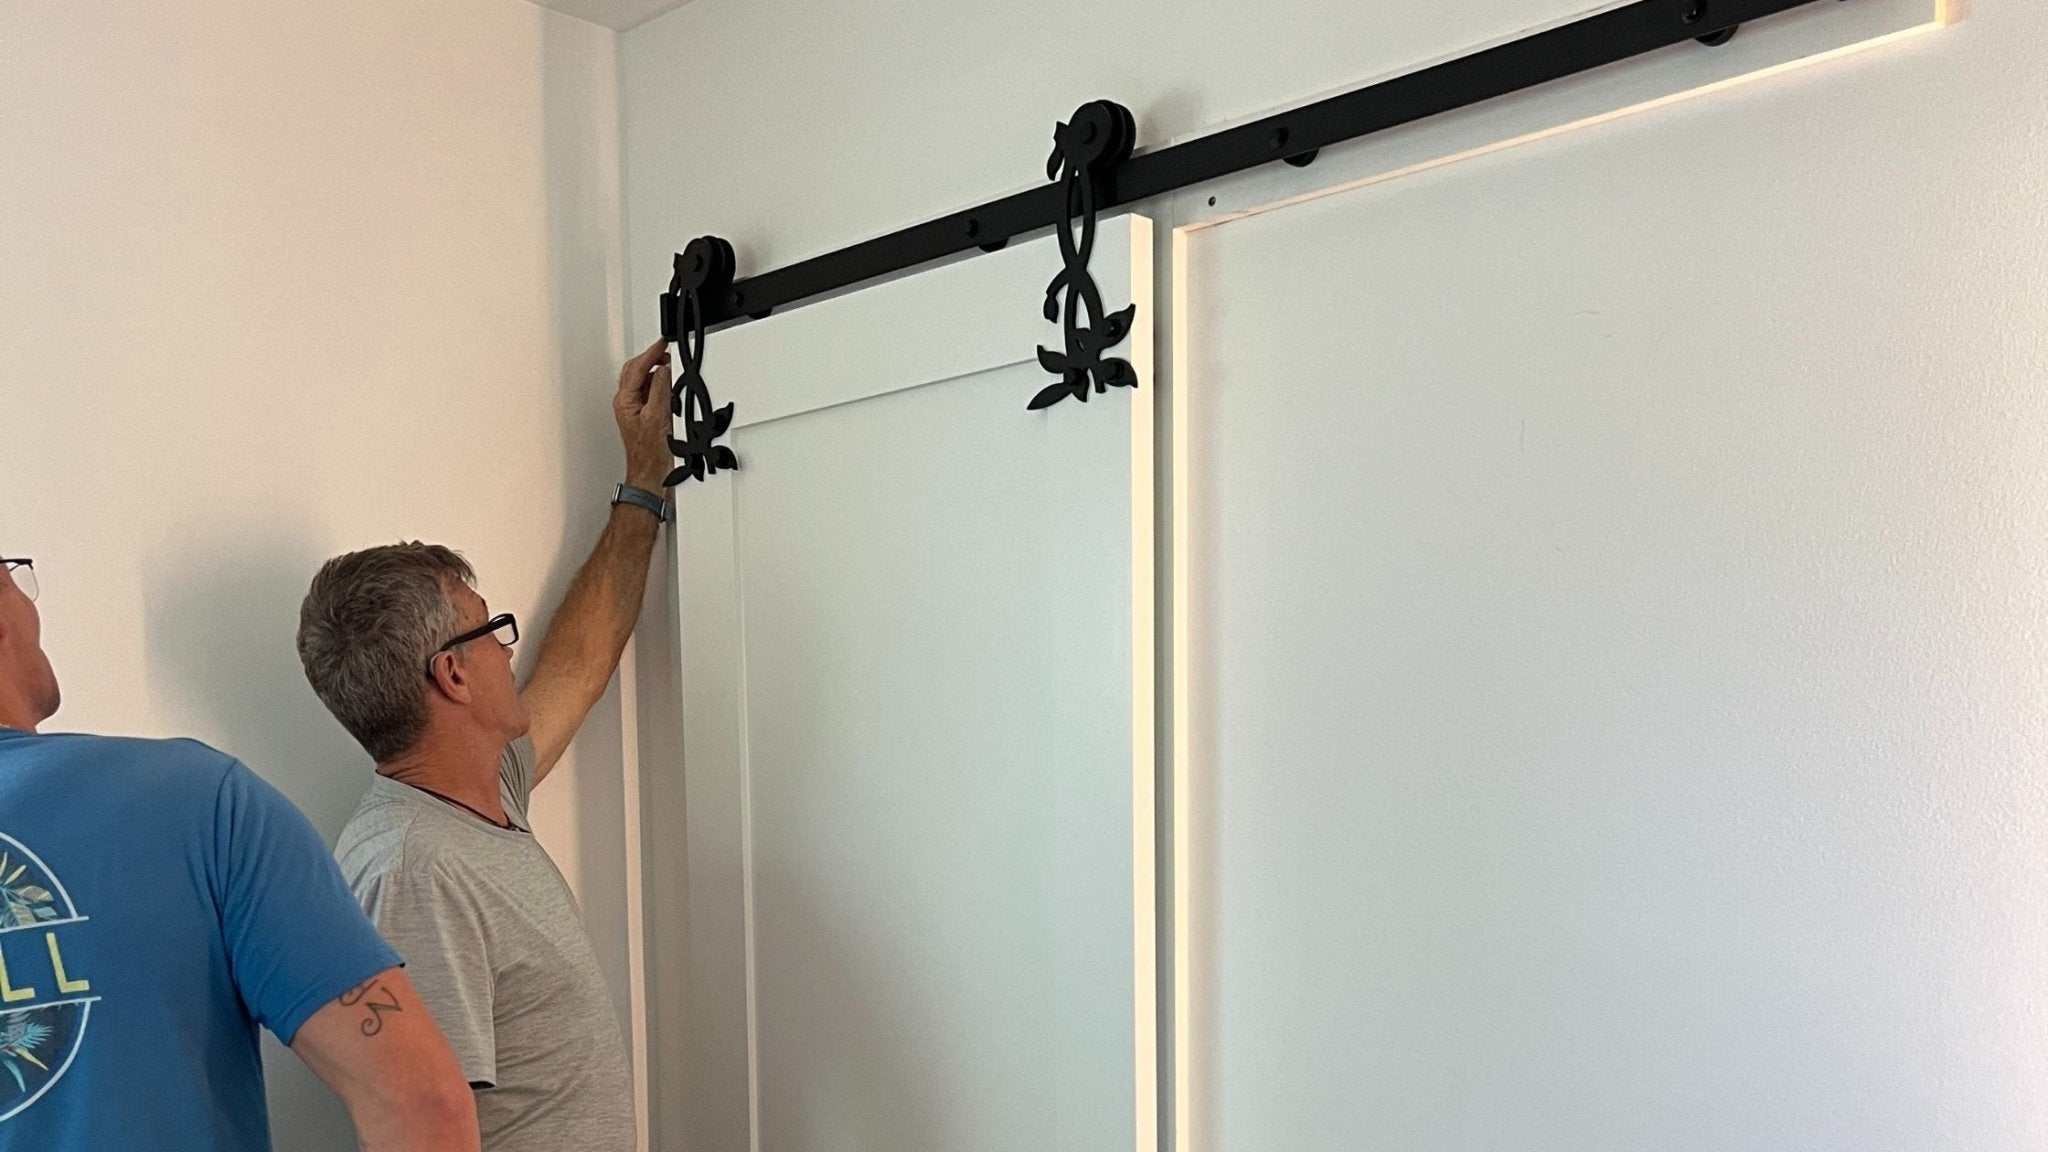
Step 3: Preparing and Attaching the Door
With the track in place, let’s focus on the door itself. Start by attaching the rollers to the top of the door slab, following your sliding door with kit instructions. If your door is unfinished, now’s the perfect time to sand and stain or paint it for a custom look.
Once the finish is dry, carefully lift the door and hang it on the track. This part might be easier with a friend, especially if your sliding door with kit is on the heavier side.
Check that the door sits at the right height from the floor and glides smoothly. Adjust the rollers as needed to get a perfect fit. Hand-finished doors in many sliding door with kit options are designed to highlight the natural woodgrain, giving your space a premium touch.
Step back and admire your progress—the transformation is already taking shape.
Step 4: Installing Floor Guides and Stoppers
To keep your sliding door with kit running straight, you’ll need to install floor guides. These handy pieces prevent the door from swinging out or bumping into your wall.
- Place the floor guide on the floor, aligned with the door path.
- Mark the screw holes.
- Secure the guide using the supplied hardware.
Don’t forget the anti-jump stoppers. These attach to the track and keep your door securely in place. Adjust the guides and stoppers for optimal movement. In high-traffic areas, this step is extra important for safety.
A well-installed sliding door with kit will feel sturdy and glide effortlessly every time you use it.
Step 5: Final Adjustments and Finishing Touches
You’re almost done! Now it’s time to fine-tune your sliding door with kit for the best performance.
- Check that the door is aligned and adjust if necessary.
- Tighten all hardware, including screws and bolts.
- Install handles or pulls to match your style.
- Wipe down the door and surrounding area.
Test the door several times. It should move quietly and smoothly, without sticking or wobbling. These finishing touches make your installation look and feel professional.
Step 6: Troubleshooting Common Issues
Sometimes, even a well-installed sliding door with kit needs a few tweaks. If the door slides unevenly, check that the track is straight and the rollers are installed correctly.
Noisy operation? Lubricate the rollers and inspect the track for debris. If the door sticks, make sure nothing is blocking its path and that the floor guide is positioned properly.
For stubborn issues, adjust the anti-jump stoppers to prevent derailment. Many sliding door with kit packages come with detailed troubleshooting guides to help you fix common problems without stress.
With a little patience and these expert tips, your sliding door with kit will work beautifully for years to come.
Expert Tips for Flawless 2026 Installations
Looking to make your sliding door with kit installation not just functional, but truly flawless? Let’s break down the expert strategies that will help you get stylish, durable, and safe results that last. From design choices to code compliance, these tips will set you up for sliding door success in 2026.
Maximizing Style & Functionality
Want your sliding door with kit to be a statement piece? Start by choosing finishes and materials that match your space. For a modern vibe, go with glass panels and minimalist hardware. If you love rustic charm, wood doors with visible grain and matte black tracks are perfect. Double doors can add drama to wide openings, making any entryway feel grand.
Don’t forget the hardware—think of it as jewelry for your door. Sleek handles or bold pulls can elevate the look instantly. You can explore modern barn door hardware styles to find the perfect match for your design vision.
Mix and match elements, like brushed nickel in a contemporary kitchen or classic wood in a cozy den. With the right sliding door with kit, you’ll get both function and flair.
Ensuring Durability & Longevity
A sliding door with kit should stand the test of time, so quality matters. Go for solid wood doors, stainless steel tracks, and heavy-duty rollers for maximum strength. These materials resist wear, making them ideal for high-traffic areas.
Maintenance is simple but essential. Regularly tighten hardware and lubricate rollers for smooth sliding. To protect finishes, skip harsh cleaners. Use a soft, damp cloth to keep everything looking new.
Many kits now offer limited lifetime warranties, a testament to their long-lasting performance. With the right care and the best sliding door with kit materials, you’ll enjoy beauty and reliability for years.
DIY vs. Professional Installation: What to Consider
Thinking of installing your sliding door with kit yourself? If you’re comfortable with tools and following instructions, many kits are designed for easy DIY. You’ll save money and enjoy the satisfaction of a job well done.
However, some setups—like double or bypass doors—can be complex. If you’re unsure about structural requirements or want a perfect finish, hiring a professional might be the way to go. The upfront investment could save you time and prevent headaches down the road.
In the end, weigh your skills against the project’s complexity. Either way, a sliding door with kit can be installed to look and work beautifully.
Safety and Building Code Compliance
Safety should never take a back seat when installing a sliding door with kit. Start by checking local building codes to ensure your installation meets all regulations. Use the right anchors for your wall type—drywall or solid wood—and always make sure the track is rated for the door’s weight.
Commercial spaces or special needs, like ADA compliance, may have additional requirements. For residential projects, double-check that all hardware is secure and that the sliding door with kit operates smoothly without risk of derailment.
A little extra attention to safety and code details will give you peace of mind, knowing your sliding door with kit is as safe as it is stylish.
Design Ideas & Inspiration: Sliding Doors in Modern Spaces
Ready to spark your creativity with the perfect sliding door with kit setup? Whether you want a showstopper entry or a subtle space-saver, let’s explore how you can make your space shine in 2026.
Trending Styles for 2026
Thinking about the hottest looks for your sliding door with kit? You’re in luck—this year is all about blending function with eye-catching style. Classic barn doors are still a favorite for rustic and farmhouse interiors, but they now come in bolder colors and patterns. Matte black hardware and vertical stripe door designs are everywhere. If you love a contemporary vibe, frameless glass panels and geometric motifs are taking center stage.
Natural wood finishes give warmth and character, while glass doors with slim frames add a sleek, airy feel. Want to go bold? Try a bright hue or a dramatic diamond pattern for instant personality. Minimalist hardware keeps the look fresh and uncluttered.
Curious about what’s trending beyond the basics? Check out the Top Sliding Door Design Trends 2026 for inspiration on eco-friendly options and smart features that are changing the game.
Room-by-Room Applications
A sliding door with kit is a game-changer for all kinds of rooms. In bedrooms, they create space-saving closet access without the hassle of swinging doors. For kitchens, use one to hide a pantry or utility area, keeping things organized and stylish. Offices benefit from glass sliding doors that let in light while reducing noise, perfect for remote work or study zones.
Laundry rooms and mudrooms get a major upgrade with bypass kits that make the most of limited wall space. If you have a wide entry or want to separate living and dining spaces, double sliding doors add drama and flexibility.
Let’s break it down in a quick table:
| Room | Kit Type | Key Benefit |
|---|---|---|
| Bedroom | Single/Bypass | Saves space, easy access |
| Kitchen | Single/Double | Hides clutter, adds style |
| Office | Glass/Double | Light, privacy, flexibility |
| Laundry | Bypass | Fits tight spaces |
No matter the room, there’s a sliding door with kit that fits just right.
Customization & Personalization Ideas
Ready to make your sliding door with kit truly your own? Start by choosing an unfinished door you can paint or stain to match your décor. Add decorative handles or pulls for personality, or swap out hardware for a totally new vibe. Frosted glass panels are a smart pick if you want privacy but still want to let natural light flow through.
You can even add a touch of whimsy with bold colors or unique patterns. Whether you’re going modern, rustic, or somewhere in between, the customization options are nearly endless.
Space-Saving Solutions & Accessibility
A sliding door with kit is the secret weapon for small or tricky spaces. Got a narrow hallway or tiny bathroom? Sliding doors take up less room than swinging ones, making every square inch count. Soft-close mechanisms are a great upgrade for families, preventing slams and pinched fingers.
Mini hardware kits are perfect for cabinets or tight nooks, letting you bring the sliding door with kit look to unexpected places. Accessibility is also easier to achieve, since sliding doors can be fitted with wider openings for wheelchairs or strollers. With the right kit, style and function go hand in hand.
Maintenance & Troubleshooting for Long-Term Performance
Keeping your sliding door with kit in top shape is easier than you might think. With just a little regular care and some know-how, you can ensure smooth operation and a long lifespan. Let’s break down the essential steps for routine maintenance, quick fixes, and knowing when it’s time to call in the pros.
Routine Care and Cleaning
To keep your sliding door with kit gliding effortlessly, regular cleaning is key. Start by wiping down the tracks and rollers every couple of weeks. Use a vacuum or a soft brush to remove dust and debris that can cause sticking or noise.
For the door itself, choose a gentle, non-abrasive cleaner. If your kit features a hand-finished or stained wood door, avoid harsh chemicals and stick to a damp microfiber cloth. Check the hardware, like handles and screws, for any signs of loosening. Give them a quick tighten to prevent bigger issues later.
A little routine attention goes a long way. If your sliding door with kit has glass panels, clean both sides with a streak-free solution for a polished look. Remember, consistent upkeep not only preserves appearance but also prevents wear and tear over time.
Addressing Common Problems
Sometimes, even the best sliding door with kit will need a bit of troubleshooting. Is your door squeaking or sticking? Try lubricating the rollers with a silicone-based spray—avoid oil-based products that attract dirt. If the door is misaligned, check the track and roller brackets, then adjust as needed.
Loose handles or rattling hardware can usually be fixed by tightening screws and bolts. If you notice the door swaying or not staying on course, inspect the floor guide. Worn or broken guides are a common culprit. You can find replacement floor guides for sliding doors to restore stability and smooth function.
For persistent issues, double-check that all mounting hardware is secure. Sometimes, a simple adjustment is all it takes to get your sliding door with kit back on track.
Upgrading and Accessorizing Over Time
One of the perks of owning a sliding door with kit is the ability to customize and upgrade as your style changes. Want a new look? Swap out the handles or pulls for a fresh accent. Many kits allow for easy addition of soft-close or anti-slam features, which can be especially helpful in busy households.
If you notice floor guides or stoppers wearing out, it’s smart to replace them promptly. These small touches keep your sliding door with kit performing like new and help you tailor the door to your evolving needs.
When to Seek Professional Help
There are times when a sliding door with kit needs more than a DIY fix. If you’re constantly battling misalignment or operational problems despite your best efforts, it may be time to bring in a pro. Structural concerns, like loose tracks or wall damage, should always be addressed by an expert.
Upgrading to advanced hardware, custom doors, or making changes for ADA compliance also calls for professional assistance. If your sliding door with kit is in a commercial or high-traffic space, regular checkups by a qualified technician can prevent costly repairs down the line.
So, after walking through all the expert tips and step by step guidance, are you feeling ready to start your own sliding door project for 2026? Whether you’re dreaming of a rustic barn door or a sleek modern style, the right hardware kit can make all the difference—especially when it comes with quality, durability, and support you can count on. If you want an easy, reliable upgrade for your space, why not browse the latest options at barn door hardware? You’ll find everything you need to turn those renovation plans into reality, with free shipping and a lifetime warranty to boot.
