
You know that feeling when you walk into a home and immediately notice something that makes the whole space feel different? That's what happened to my friend Sarah when she visited a farmhouse-style café in Nashville last spring. The sliding barn door separating the dining area from the kitchen wasn't just functional-it was a statement piece that transformed the entire vibe. Three weeks later, she was standing in her own hallway, tools in hand, ready to tackle her first barn door project. Installing a barn door might seem intimidating at first, but with the right preparation and guidance, it's a weekend project that can completely change how you think about your home's design and functionality.
Understanding Why Barn Doors Work So Well
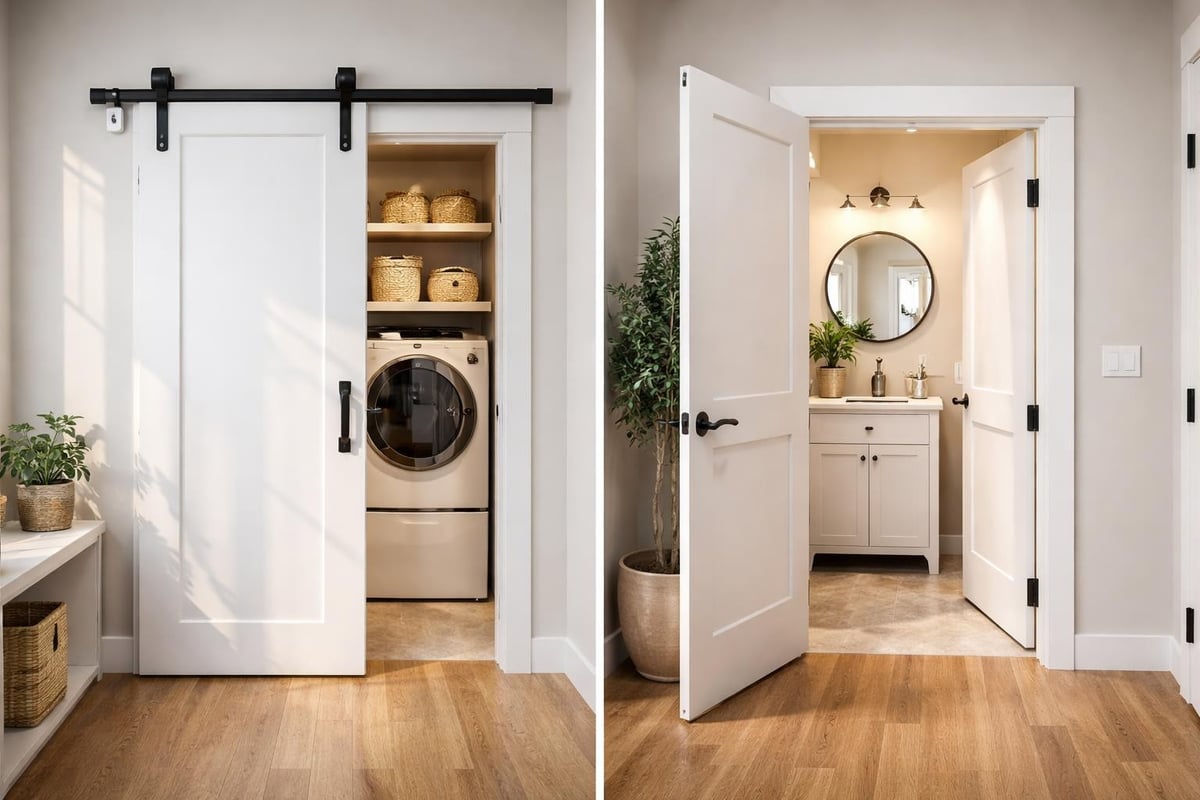
Before you dive into the installation process, it's worth understanding what makes barn doors such a popular choice in 2026. Unlike traditional hinged doors that require clearance to swing open, barn doors slide parallel to the wall, saving valuable floor space in tight areas like closets, bathrooms, and laundry rooms.
The aesthetic appeal is undeniable too. Whether you're going for modern farmhouse, industrial chic, or contemporary minimalism, barn door hardware comes in styles that complement virtually any design vision. I've seen installations in century-old homes and brand-new condos, and they work beautifully in both settings.
The Practical Advantages You'll Actually Notice
Beyond looks, there are real functional benefits:
- Accessibility: Easier to operate for people with mobility challenges
- Durability: Quality hardware systems last for decades with minimal maintenance
- Flexibility: You can easily switch out the door panel without replacing the entire system
- Sound management: Heavier doors provide better noise dampening than hollow-core alternatives
Here's something most people don't think about: barn doors also hide wall imperfections. If you've got a doorway with uneven framing or outdated trim you'd rather not deal with, the barn door covers it all up while adding character.
Gathering Your Tools and Materials
Installing a barn door requires more precision than brute strength, but you'll need the right equipment to get professional results. Let me walk you through what you actually need versus what's just nice to have.
Essential Tools for the Job
| Tool | Purpose | Pro Tip |
|---|---|---|
| Stud finder | Locating wall studs for secure mounting | Get an electronic model-worth every penny |
| Level (4-foot minimum) | Ensuring track is perfectly horizontal | A laser level makes this even easier |
| Drill/driver | Installing mounting hardware | Have both Phillips and flat bits ready |
| Tape measure | Accurate measurements throughout | Measure three times, cut once |
| Circular saw or miter saw | Cutting track to length if needed | Some kits come pre-cut |
You'll also want safety glasses, a pencil for marking, and a helper for the actual door-hanging portion. Trust me on that last one-Sarah tried to hang her door solo and nearly dropped it on her foot.
Choosing the Right Hardware Kit
The hardware kit is where quality really matters. You're looking for systems that can support your door's weight while operating smoothly for years. The Classic J-Strap Barn Door Hardware Kit has been the gold standard since it first appeared in farmhouses generations ago, combining that iconic curved design with modern engineering that supports doors up to 200 pounds.
When you're selecting hardware, consider these factors:
- Door weight and thickness: Standard kits handle 1-3/8" to 1-3/4" thick doors
- Track length: Generally twice your door width plus a few inches
- Mounting surface: You need solid backing-drywall alone won't cut it
- Aesthetic style: From industrial to traditional farmhouse
Preparing Your Doorway and Wall
This is where many DIY projects go sideways, so let's get methodical. Proper preparation makes the actual installation surprisingly straightforward.
Measuring and Planning
Start by measuring your door opening width and height. Your barn door should overlap the opening by at least 2 inches on each side and extend about an inch below the bottom to ensure privacy and proper coverage.
Here's a real-world example: When my neighbor Tom installed his bathroom barn door, he measured just the opening width and ordered a door that was exactly the same size. The result? You could see into the bathroom from either side when the door was closed. He ended up having to order a new, wider door. Don't be like Tom.
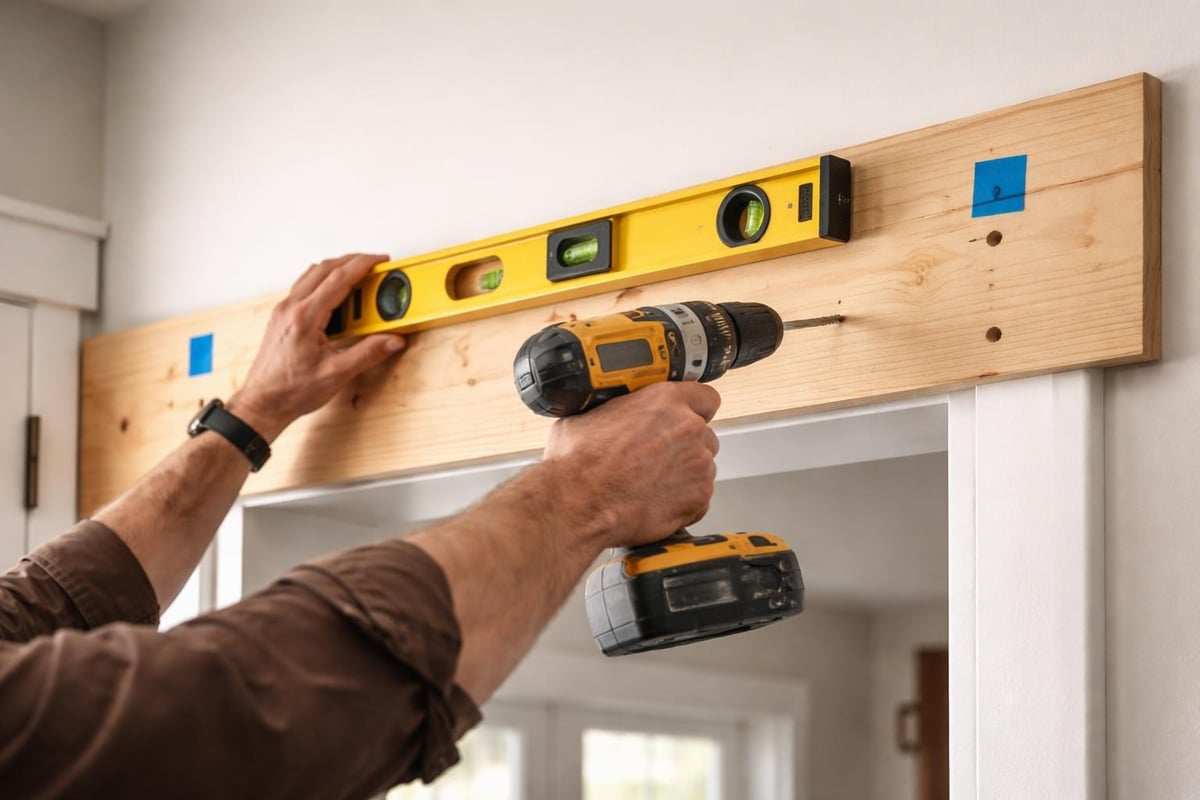
Installing the Header Board
The header board is your foundation-it's what anchors the entire system to your wall. This structural element distributes the weight across multiple wall studs, preventing sagging or failure over time.
Installation steps:
- Locate at least two wall studs using your stud finder
- Cut your header board (typically a 1x4 or 2x6) to extend beyond the door width
- Position it level above the doorway
- Drill pilot holes and secure with 3-inch wood screws into each stud
- Verify it's level before moving forward
The header board should be mounted high enough to allow clearance for your door's height plus the roller hardware-usually 1-2 inches above the door frame. Check the specific clearance requirements for your hardware kit since they can vary.
Mounting the Track System
Now we're getting to the satisfying part-watching your barn door system take shape. The track installation is critical because any deviation from level will cause your door to drift open or closed on its own.
Getting the Track Perfectly Level
Position your track on the header board and use your 4-foot level to ensure it's absolutely horizontal. Even a tiny slope will be noticeable once the door is hung. Mark your mounting hole locations with a pencil.
I learned this lesson the hard way during my first installation in 2019. I eyeballed it instead of using a level, thinking "close enough" would work. My door kept slowly sliding open throughout the day. I had to unmount everything and start over-not fun after two hours of work.
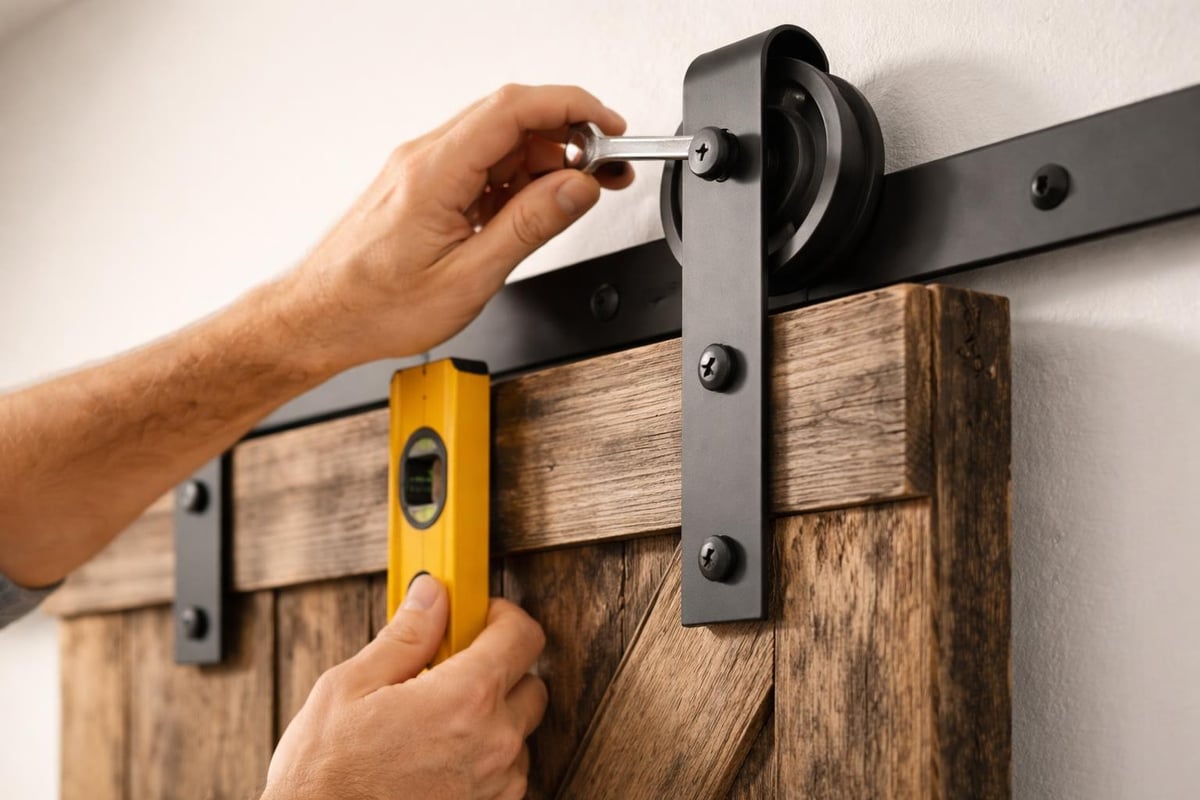
Securing the Track
Most quality hardware kits include lag bolts or heavy-duty screws designed specifically for track mounting. Follow the manufacturer's spacing recommendations, but generally you'll want a mounting point every 12-16 inches.
- Drill pilot holes through the track and header board
- Install mounting hardware from one end to the other
- Double-check level after each mounting point
- Tighten all fasteners securely but avoid overtightening
Some installers prefer to loosely attach all mounting points first, verify everything is level, then tighten fully. This method allows for minor adjustments before committing.
Hanging and Adjusting Your Door
This is the moment of truth where your barn door goes from a pile of parts to a functional, beautiful feature. You'll definitely want that helper I mentioned earlier.
Attaching the Rollers
The roller mechanism attaches to the top of your door. Most systems use adjustable hangers that allow you to fine-tune the door height and ensure it hangs plumb. Detailed installation guides often recommend installing the rollers on the door before lifting it into position.
Position the rollers according to your kit's specifications-usually a few inches from each edge. Mark your mounting holes, drill pilot holes, and secure the roller brackets with the provided bolts. Make sure they're tight but not so tight that you strip the threads.
Lifting the Door onto the Track
Here's where your helper becomes essential. Together, you'll lift the door and carefully slide each roller onto the track. The door will hang from these rollers, so take your time getting them properly seated.
Pro tip from experience: Have one person support the door weight while the other guides the rollers onto the track. Sarah and her husband tried to rush this step and ended up with a small dent in their door when it slipped. Slow and steady wins this race.
Fine-Tuning the Alignment
Once the door is hanging, you'll likely need to adjust it. Most roller systems have adjustment screws that let you:
- Raise or lower the door height
- Tilt the door to make it perfectly vertical
- Adjust spacing from the wall
Use your level against the door's edge to ensure it's plumb. Check that the bottom clears the floor by about half an inch-enough to prevent dragging but not so much that you lose privacy.
Adding the Finishing Touches
You're almost done, but these final details make the difference between a functional installation and a professional-looking one.
Installing Door Guides and Stops
Floor guides keep the bottom of your door from swinging away from the wall. These small brackets mount to the floor and create a channel for the door to ride in. They're especially important for doors in high-traffic areas or homes with kids who might push on the door.
Track stops prevent the door from sliding off the end of the track. Position these about an inch from each end of the track-close enough to stop the door but with enough clearance that the door fully covers the opening.
Adding Handles and Locks
Most barn doors benefit from a handle on both sides for easy operation. Flush pulls work great for doors that need to close into a pocket space, while traditional handles provide better grip.
If you need privacy (like for a bathroom installation), consider adding a simple sliding lock or hook latch. These mount easily to the door and adjacent wall, though they won't provide the same security as a traditional keyed lock.
Troubleshooting Common Installation Challenges
Even with perfect preparation, you might encounter a few hiccups. Let's talk through the most common issues and their solutions.
The Door Won't Slide Smoothly
If your door feels sticky or requires too much effort to move, check these potential culprits:
- Uneven track: Remeasure with your level and adjust mounting if needed
- Overtightened hardware: Slightly loosen roller bolts to reduce friction
- Floor guide too tight: Adjust the guide to allow easier movement
- Debris in track: Clean out the track channel thoroughly
My friend Mike called me in a panic after his new barn door barely budged. Turns out he'd overtightened the roller bolts so much they were binding against the track. Five minutes of adjustment and it was gliding perfectly.
Gap Issues and Privacy Concerns
Problem: Light showing around the door edges
Solutions:
- Add weatherstripping along the door edges
- Install a small trim piece above the door
- Adjust door height to close the bottom gap
- Consider adding a door sweep at the bottom
The Door Drifts Open or Closed
This almost always indicates the track isn't perfectly level. Even a quarter-inch slope over six feet will cause noticeable drift. You'll need to remount the track, which is frustrating but necessary for proper function.
Real-World Installation Stories and Lessons
Let me share a couple of experiences that taught me valuable lessons about installing a barn door.
Last summer, I helped my cousin install a barn door for her pantry. We'd measured everything perfectly, ordered the right hardware, and felt totally prepared. But when we went to mount the header board, we discovered the wall studs were spaced irregularly-something common in older homes. Instead of the standard 16-inch spacing, we had 24 inches in one section. We ended up using a longer, thicker header board (a 2x6 instead of our planned 1x4) to bridge the gap securely. The comprehensive installation guides available online helped us troubleshoot this unexpected challenge.
Another friend tackled a barn door installation for his home office, and he got creative with the approach. Rather than a standard solid wood door, he used a frosted glass panel in an aluminum frame. The installation process was identical, but the result lets natural light flow between rooms while maintaining visual privacy during video calls. It's a perfect example of how the basic installation principles work regardless of door style.
Maintaining Your Barn Door System
Once you've finished installing a barn door, a little ongoing maintenance keeps it operating smoothly for years. The good news? It's minimal compared to traditional doors with hinges and closers.
Monthly Quick Checks
Run through this simple checklist once a month:
- Wipe down the track to remove dust and debris
- Check that all bolts and screws remain tight
- Test the door's glide and adjust if needed
- Verify floor guides haven't shifted position
Annual Maintenance Tasks
| Task | Method | Frequency |
|---|---|---|
| Deep clean track | Vacuum then wipe with damp cloth | Yearly |
| Lubricate rollers | Apply silicone-based lubricant | Yearly |
| Inspect all hardware | Check for wear or damage | Yearly |
| Re-tighten all fasteners | Use appropriate tools | Yearly |
The family-owned business behind quality barn door systems often backs their products with strong warranty coverage, which gives you peace of mind that your investment is protected.
Choosing Between DIY and Professional Installation
Here's the honest truth: installing a barn door is absolutely achievable as a DIY project if you're comfortable with basic tools and have a helper available. The process isn't particularly complex, but it does require attention to detail and patience.
Consider going the DIY route if:
- You have experience with similar home improvement projects
- You own or can borrow the necessary tools
- You've got a full weekend to dedicate to the project
- Your wall structure is straightforward (standard studs, no complications)
Call a professional if:
- You're working with brick, concrete, or metal studs
- The installation involves cutting into tile or expensive finishes
- You need to relocate electrical outlets or switches
- You simply don't have the time or inclination for DIY
There's no shame in hiring help. A professional installer can complete in a few hours what might take you a full weekend, and they'll guarantee their work. That said, there's genuine satisfaction in stepping back and admiring something you built with your own hands.
Making Your Barn Door Installation Personal
One aspect I absolutely love about barn door projects is how customizable they are. The hardware might follow standard installation procedures, but the door itself is your canvas for creativity.
I've seen barn doors made from reclaimed wood with authentic weathering, modern minimalist designs with metal panels, and even repurposed antique doors with incredible patina. Some people paint them bold colors, others keep the natural wood grain, and some add decorative metal elements that tie into other room features.
The hardware finish matters too. Black matte finishes work beautifully in industrial or modern spaces, while brushed nickel or brass complement traditional and transitional designs. Exploring different barn door styles and ideas can spark inspiration for your unique vision.
When you're ready to select the perfect hardware for your project, having access to detailed specifications and clear guidance makes all the difference in choosing components that work together seamlessly.

Cost Considerations and Budgeting
Let's talk numbers because understanding the investment helps you plan appropriately. Installing a barn door typically costs between $300 and $1,000 for a DIY project, depending primarily on your door choice and hardware quality.
Budget Breakdown
Hardware kit: $150-$400
- Entry-level kits: $150-$250
- Mid-range quality: $250-$350
- Premium systems: $350-$500+
Door panel: $100-$500
- Stock hollow-core: $100-$200
- Solid wood: $250-$400
- Custom or specialty: $400+
Additional materials: $50-$100
- Header board lumber
- Mounting hardware beyond kit
- Floor guides and stops
- Handles and locks
Professional installation adds $200-$400 to the total if you choose that route. However, the right hardware from a reputable source means you're getting American-made quality that'll last decades, not just a few years. Many suppliers offer free shipping on hardware kits, which helps offset costs.
Maximizing Your Space with Smart Planning
Before you commit to installing a barn door, consider how it'll impact your room's flow and functionality. Barn doors need wall space to slide across, so you can't place furniture directly against that section of wall when the door is open.
Smart planning tips:
- Measure the full travel path before positioning furniture
- Consider whether the door will slide left, right, or if you need a bypass system
- Account for baseboard and trim that might interfere with floor guides
- Think about door swing direction for optimal room access
Some homeowners get creative with track installation approaches that work around architectural features like crown molding or low ceilings. The standard installation places the track high on the wall, but you can adapt based on your specific space constraints.
Final Adjustments for Perfect Operation
After you've completed the basic installation, spend time fine-tuning everything. Open and close the door twenty or thirty times, paying attention to how it feels and sounds. A properly installed barn door should glide effortlessly with just a gentle push.
Listen for any scraping, grinding, or clicking sounds that indicate adjustment needs. The door should stop smoothly at both ends without banging against the stops. If you notice any resistance, take time now to identify and correct it rather than living with a subpar installation.
Check the door from different angles and lighting conditions to ensure it provides adequate privacy if that's a requirement. You might discover gaps that weren't obvious during installation that need addressing with weatherstripping or trim.
Installing a barn door transforms more than just your doorway-it changes how you experience and move through your home while adding undeniable style and character. Whether you're working on a compact closet or making a statement in your main living area, the installation process follows the same fundamental principles we've covered here. When you're ready to start your barn door project with confidence, The Barn Door Hardware Store provides everything you need, from American-made hardware kits backed by a limited lifetime warranty to expert guidance that ensures your installation succeeds the first time.
