You've probably walked into a friend's house and stopped in your tracks when you saw their stunning barn door gliding effortlessly across a bedroom or bathroom entrance. That moment of "I need that in my home" happens more often than you'd think. But here's what most people don't realize until they start shopping: choosing the right barn door and kit isn't just about picking something that looks good. It's about understanding how different hardware systems work, what your space actually needs, and how to avoid the frustration of buying the wrong components.
Understanding What Makes a Complete Barn Door and Kit
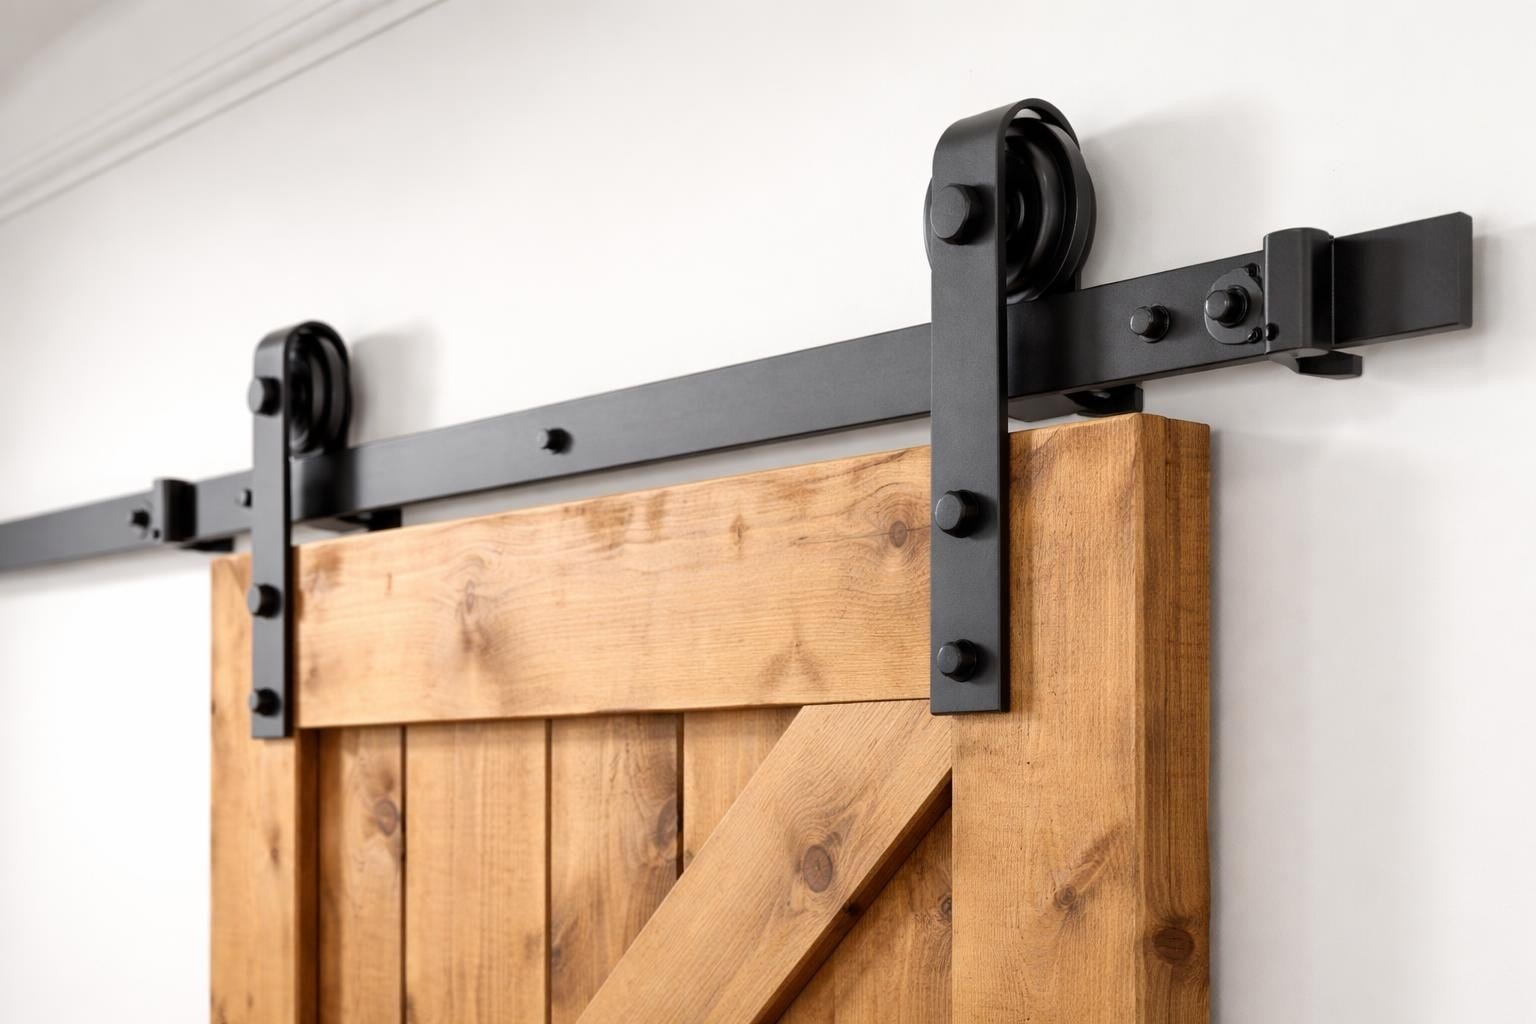
When you're shopping for a barn door and kit, you're really looking at two major components that need to work perfectly together. The door itself is only half the equation. The hardware kit is what transforms a regular door into a sliding showpiece.
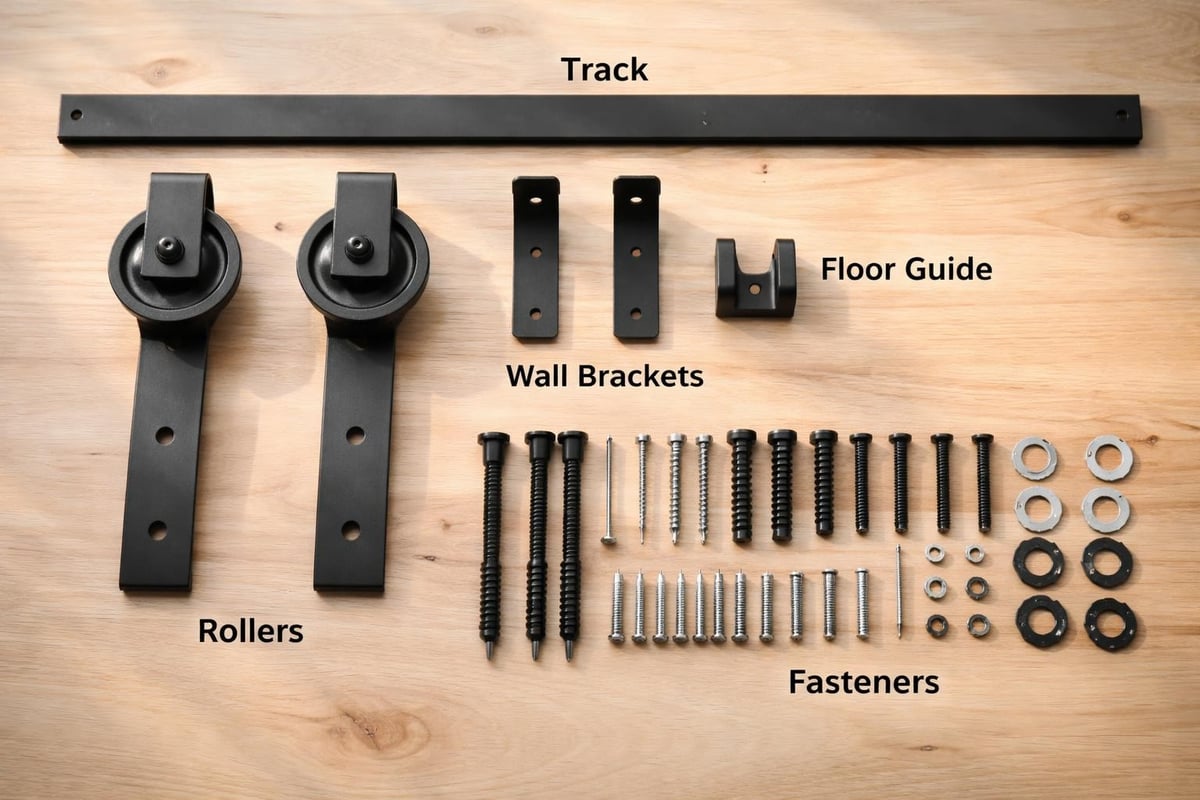
A complete kit typically includes the track, rollers, mounting brackets, floor guides, and all the necessary screws and anchors. Some manufacturers bundle everything you need in one box, while others sell components separately. This is where things get confusing for first-time buyers.
What's Actually Included in Most Kits
Let me tell you about Sarah, a homeowner from Portland who learned this lesson the hard way. She ordered what she thought was a complete barn door and kit, only to discover she needed to purchase a separate door stop, handle, and additional mounting hardware. The project sat unfinished for three weeks while she waited for the missing pieces.
Here's what you should expect in a quality hardware kit:
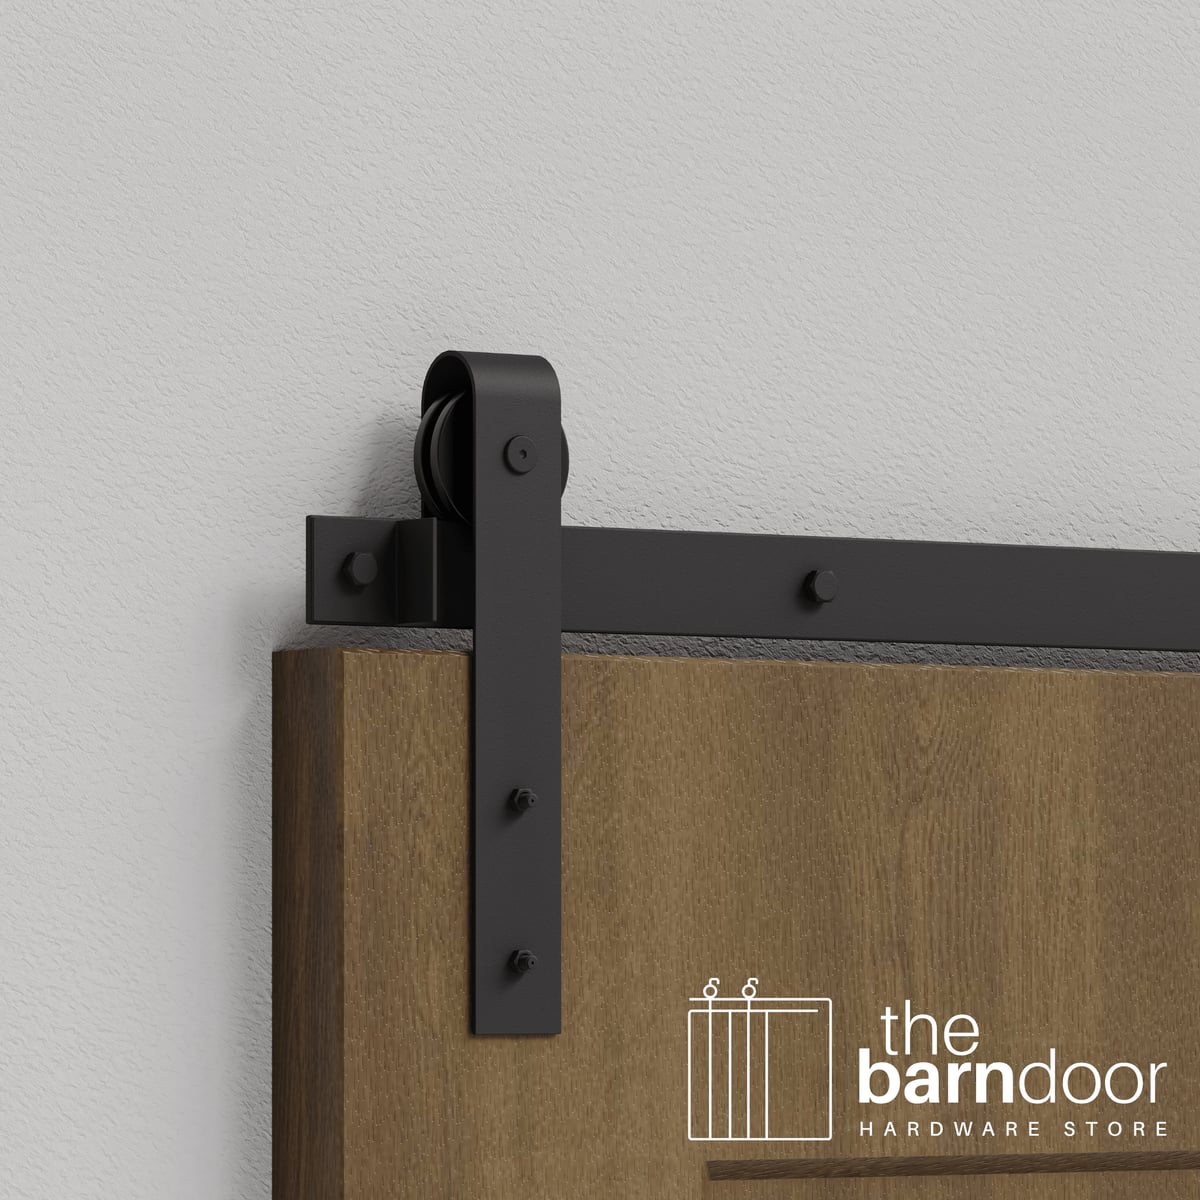
- Track system - the rail that mounts to your wall
- Roller assemblies - the wheels that attach to your door
- Mounting brackets - hardware that secures the track
- Floor guide - keeps the door bottom from swinging
- Installation hardware - screws, anchors, and spacers
- Installation instructions - ideally with diagrams
Some premium kits also include decorative elements like strap covers or custom handles. The detailed specifications from manufacturers can help you understand exactly what you're getting before you buy.
Choosing Between Different Hardware Styles
The style of your barn door and kit dramatically impacts both the aesthetic and functionality of your installation. I've seen homeowners fall in love with a particular look, only to discover it doesn't work with their door thickness or wall type.
Traditional vs. Modern Hardware Designs
Traditional J-strap designs have been around for generations. They feature that curved, classic roller bracket that screams "farmhouse charm." The Classic J-Strap Barn Door Hardware Kit exemplifies this timeless style, supporting doors up to 200 pounds while maintaining that authentic look that works beautifully in both rustic and surprisingly contemporary spaces.
Modern systems, on the other hand, take a minimalist approach. They often feature sleeker profiles, hidden components, or industrial-inspired finishes. Your choice here isn't just about taste. It's about how the hardware complements your existing décor.
| Hardware Style | Best For | Visual Impact | Typical Price Range |
|---|---|---|---|
| J-Strap Classic | Farmhouse, traditional, rustic | High visibility, decorative | $150-$300 |
| Hidden Roller | Contemporary, minimalist | Low profile, discrete | $200-$400 |
| Industrial | Loft, urban, modern | Bold, statement-making | $250-$500 |
| Flat Track | Transitional, versatile | Clean, neutral | $175-$350 |
Think about Mark and Jennifer, who renovated their 1920s bungalow in Denver. They initially wanted ultra-modern hardware for their master bathroom barn door and kit. After consulting with a designer, they realized traditional hardware would actually honor the home's character while still feeling fresh. The lesson? Your hardware choice should consider your home's architecture, not just current trends.
Installation Considerations for Your Barn Door and Kit
Here's something nobody tells you until you're halfway through installation: the wall behind your barn door matters more than the door itself. I can't count how many customers have called us after discovering their drywall alone won't support a sliding door system.
Structural Requirements You Can't Ignore
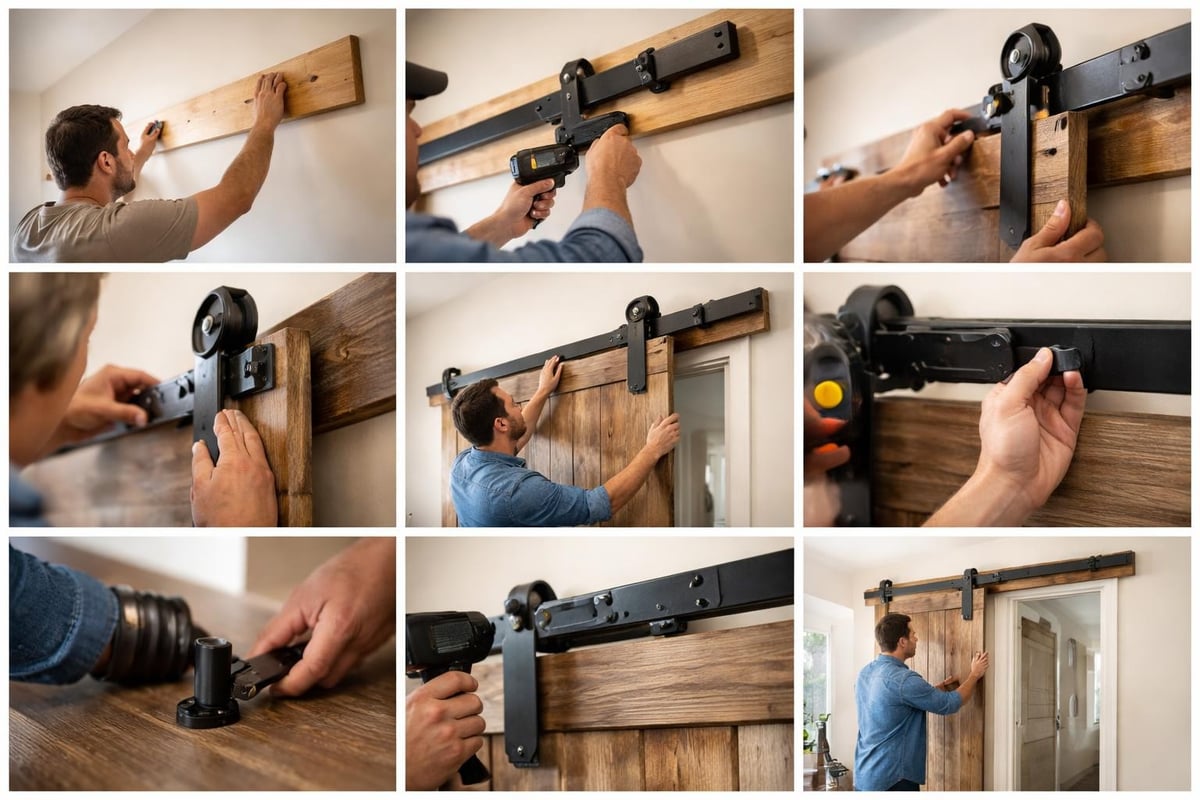
Before you even unbox your barn door and kit, you need to assess your wall structure. The track must be anchored into solid wood studs or a properly installed header board. This isn't negotiable.
A standard interior door weighs between 50 and 100 pounds, but your barn door and kit system needs to support dynamic loads. That means when someone slides the door, the force multiplies. You're looking at needing support for 2-3 times the door's static weight.
Here's your pre-installation checklist:
- Locate wall studs using a reliable stud finder
- Measure twice for track placement and door clearance
- Install a header board if studs don't align with your track
- Check floor clearance (you need about 1/2 inch gap)
- Verify door thickness matches your hardware specs
- Test wall integrity to ensure it can handle the weight
The professional installation guidance from Masonite walks through these steps with helpful visuals that make the process less intimidating.
Common Installation Mistakes
Tom, a DIY enthusiast from Austin, shared his installation story with us last year. He mounted his barn door and kit directly to drywall, thinking the included anchors would be sufficient. Three days later, his teenage son pulled the door open with a bit too much enthusiasm, and the entire track came down. Tom had to patch the wall, install a proper header board, and remount everything. What should have been a weekend project became a two-week ordeal.
Sizing Your Barn Door and Kit Correctly
Getting the measurements right is where most DIY projects either succeed brilliantly or fail spectacularly. Your barn door needs to be wider than the opening it's covering. But how much wider?
The general rule: add at least 2 inches to each side of your doorway width. So if you have a 30-inch opening, you're looking at a 34-inch door minimum. Many designers recommend going even wider for better coverage and visual balance.
Height Considerations Matter Too
Door height is equally critical. You want your barn door to hang about 1/2 inch above the floor. This means measuring from floor to ceiling, subtracting the hardware height (usually 2-3 inches), and accounting for that clearance gap.
Let me break down a real-world example:
- Ceiling height: 96 inches
- Hardware requires: 2.5 inches above door
- Floor clearance needed: 0.5 inches
- Maximum door height: 93 inches
The sliding door track and hardware specifications provide detailed measurements for different systems, helping you calculate exactly what you need.
Material Choices for Your Door Panel
While we often focus on the hardware when discussing a barn door and kit, the door material itself dramatically affects both performance and longevity. The wrong choice can lead to warping, sagging, or hardware failure.
Solid Wood vs. Engineered Alternatives
Solid wood doors offer unmatched authenticity and can be custom-milled to any dimension. They're beautiful, substantial, and will last for decades with proper care. But they're also heavy, expensive, and can expand or contract with humidity changes.
Engineered doors, including hollow-core and MDF options, provide excellent stability at a fraction of the weight and cost. Modern manufacturing techniques create engineered doors that look convincingly like solid wood, especially after painting or staining.
Solid Wood Doors:
- Weight: 80-150 pounds
- Cost: $300-$1,200+
- Pros: Authentic, durable, can be refinished multiple times
- Cons: Heavy, expensive, sensitive to humidity
Engineered Doors:
- Weight: 40-80 pounds
- Cost: $150-$500
- Pros: Stable, affordable, consistent quality
- Cons: Limited refinishing options, less authentic feel
Rachel, an interior designer in Charleston, always tells her clients: "Match your door weight to your hardware capacity, not your budget to your door preference." She once had a client insist on a massive reclaimed wood door that weighed 180 pounds, only to discover their chosen barn door and kit was rated for just 150 pounds. They had to upgrade the hardware, adding $200 to the project.
Finish and Style Coordination
Your barn door and kit needs to work as a cohesive design element, not just a functional piece. The finish you choose impacts everything from maintenance requirements to how the hardware ages over time.
Matching Hardware Finishes to Your Space
Hardware finishes have exploded in variety over the past few years. You're no longer limited to basic black or brushed nickel. Now you can find premium hardware options in oil-rubbed bronze, matte black, stainless steel, antique brass, and even custom powder-coated colors.
The key is considering your existing hardware throughout the room. Do your door handles, light fixtures, and cabinet pulls share a common finish? Your barn door and kit should complement these elements, not compete with them.
Think about lighting too. A brushed stainless finish looks crisp and modern in bright, natural light but can appear cold in rooms with warm artificial lighting. Oil-rubbed bronze develops a beautiful patina over time, but it needs the right setting to shine.
Special Applications and Unique Installations
Not every barn door and kit follows the standard single-door, straight-track configuration. Some spaces demand creative solutions that go beyond the typical installation.
Bifold Systems for Smaller Spaces
Bifold barn door systems combine the space-saving benefits of a folding door with the style of barn hardware. These work exceptionally well for closets, pantries, or narrow hallways where a standard sliding door would block too much wall space.
The mechanics are slightly more complex. Instead of one door panel sliding along a track, you have two panels connected by hinges that fold together as they slide. The detailed bifold installation instructions show how the system operates and what additional considerations you need to factor in.
Bypass and Double Door Configurations
Katie and James from Nashville needed to cover a wide closet opening in their master suite. A single barn door would have been massive and unwieldy. Instead, they opted for a bypass system with two doors that slide past each other on separate tracks.
This barn door and kit configuration requires more planning:
- Double track installation
- Precise spacing between tracks
- Doors cut to overlap properly
- Special bypass brackets
But the result gives you access to the full opening width, something a single sliding door can't provide.
Maintenance and Long-Term Performance
Here's something most people don't think about when they're excitedly planning their barn door and kit installation: maintenance. Like any mechanical system, sliding barn door hardware needs occasional attention to keep performing smoothly.
Keeping Your System Running Smoothly
The rollers are the hardest-working component of your barn door and kit. They're constantly bearing weight and experiencing friction. Quality rollers feature sealed ball bearings that resist dirt and require minimal lubrication. Cheaper systems use simple wheels that wear down quickly and develop that annoying squeaking sound.
Every six months, take five minutes to:
- Wipe down the track to remove dust and debris
- Check mounting screws for tightness
- Test the door for smooth operation
- Apply a small amount of silicone lubricant if needed
- Inspect rollers for wear or damage
Michael, a contractor who's installed dozens of barn door and kit systems, says the biggest maintenance mistake he sees is over-lubrication. "People think more is better, so they spray WD-40 all over the track. Then it attracts dust and creates this gummy mess that actually makes the door harder to move."
Budget Planning for Your Project
Let's talk about money because this is where expectations and reality often collide. A barn door and kit installation ranges from a few hundred dollars to several thousand, depending on your choices.
Breaking Down the Real Costs
Here's a realistic budget breakdown for a standard single-door installation:
| Component | Budget Option | Mid-Range | Premium |
|---|---|---|---|
| Hardware Kit | $100-$150 | $200-$350 | $400-$800 |
| Door Panel | $150-$250 | $300-$500 | $600-$1,500 |
| Installation (if hiring) | $200-$300 | $350-$500 | $600-$1,000 |
| Additional Materials | $50-$75 | $100-$150 | $200-$300 |
| Total Project Cost | $500-$775 | $950-$1,500 | $1,800-$3,600 |
Don't forget hidden costs. You might need a new door handle, decorative stops, paint or stain, and possibly wall repair if you're replacing a traditional hinged door.
The comprehensive guide on hardware options provides insights into why price variations exist and what you're actually paying for when you upgrade components.
Working with Professionals vs. DIY
Should you hire a professional or tackle your barn door and kit installation yourself? The answer depends on your skill level, available time, and the complexity of your specific project.
When DIY Makes Sense
If you're comfortable using power tools, can accurately measure and mark level lines, and have a helper for the heavy lifting, DIY installation is absolutely achievable. The step-by-step installation resources available from quality manufacturers make the process much more approachable than it was even five years ago.
DIY is your best bet when:
- Installing over a standard doorway with accessible studs
- Using a single-door configuration
- Working with lighter door materials (under 100 pounds)
- You have a full weekend available for the project
- The wall structure is sound and straightforward
When to Call in the Pros
Professional installation makes sense for complex scenarios. Lisa, a homeowner in Seattle, thought she could handle her barn door and kit installation alone. Her situation involved mounting the track to a ceiling instead of a wall, coordinating with existing molding, and working around electrical fixtures. After two frustrating days, she called a professional who completed the job in four hours.
Consider hiring help when:
- Installing bypass or bifold systems
- Working with doors over 150 pounds
- Dealing with unusual wall materials (brick, concrete, metal studs)
- Installing multiple doors in one space
- Time constraints prevent proper DIY execution
Quality Indicators in Hardware Kits
Not all barn door and kit options are created equal, and the differences aren't always obvious from product photos or descriptions. Knowing what separates quality hardware from cheap imitations can save you from expensive mistakes.
What to Look for in Premium Hardware
The roller assembly is your first quality checkpoint. Premium systems use sealed ball bearings that create smooth, quiet operation. You should also examine the track material and thickness. Quality tracks are made from heavy-gauge steel, while budget options might use thinner metal that can bend or bow under weight.
Amanda, who manages a boutique hotel in Asheville, learned about quality differences after installing budget barn door and kit systems in guest rooms. Within six months, half the doors were squeaking, sticking, or had visible hardware wear. She replaced them all with commercial-grade systems that cost more upfront but have performed flawlessly for three years.
Look for these quality markers:
- Ball bearing rollers instead of simple wheels
- Heavy-gauge steel construction (at least 14-gauge for the track)
- Powder-coated finishes for durability and appearance
- Comprehensive warranties (lifetime is common for quality systems)
- Clear installation instructions with customer support available
- American manufacturing when possible for better quality control
The limited lifetime warranty offerings from established manufacturers reflect their confidence in product durability and performance.
Customization Options and Flexibility
Your barn door and kit doesn't have to look like everyone else's installation. Modern systems offer surprising flexibility for personalization and customization.
Creating a Unique Look
Track length is one of the most common customization needs. Maybe you want your door to slide completely away from the opening, requiring extra track length. Or perhaps you're working with an oversized door that needs a longer-than-standard rail.
Color customization has become increasingly popular. While black remains the most requested finish, powder coating technology allows for virtually any color match. One creative homeowner in Brooklyn matched her barn door hardware to her kitchen's deep teal cabinets, creating a stunning cohesive look.
Hardware configuration also offers flexibility. You can mount the track traditionally above the door, use ceiling-mounted systems for a floating appearance, or even create corner installations where doors slide around 90-degree turns.
Current Trends in Barn Door Design
The barn door and kit market continues to evolve, with new styles and innovations appearing regularly. Staying current with these trends helps ensure your installation feels fresh and contemporary rather than dated.
What's Popular in 2026
Minimalist hardware has gained tremendous traction over the past two years. Homeowners are moving away from chunky, heavily decorative systems toward sleeker profiles that emphasize the door itself rather than the hardware. The inspiration gallery showcases distinct approaches to barn door styling, from ultra-modern to traditional farmhouse.
Mixed materials are also having a moment. Think wood doors with metal strapping details, or glass panel inserts that allow light to pass through while maintaining privacy with frosted or textured glass.
Color-wise, black hardware still dominates, but warm metallics like brass and bronze are making a strong comeback. These finishes add warmth and sophistication that works particularly well in transitional spaces bridging modern and traditional aesthetics.
Troubleshooting Common Problems
Even with perfect installation, you might encounter issues with your barn door and kit over time. Knowing how to address common problems saves you the frustration of living with a malfunctioning door.
Solving Operational Issues
The most frequent complaint is doors that don't slide smoothly. This usually stems from track misalignment, debris buildup, or worn rollers. Before assuming you need new hardware, check the basics:
- Clean the track thoroughly - even small debris causes friction
- Verify track alignment - use a level to check for sagging
- Tighten all mounting hardware - vibration loosens screws over time
- Check roller adjustment - most systems allow vertical positioning tweaks
- Examine the floor guide - make sure it's properly positioned and not damaged
David, a handyman in Phoenix, says 80% of the "broken" barn door and kit systems he's called to repair actually just need cleaning and minor adjustments. "People panic when their door starts sticking, but usually it's just dust in the track or a loose mounting bracket," he explains.
If your door swings out at the bottom, your floor guide likely needs repositioning. This small component plays a huge role in keeping the door tracking straight, and it's often overlooked during troubleshooting.
Choosing and installing the right barn door and kit transforms your space with both style and functionality. The key is understanding your specific needs, selecting quality components that match your project requirements, and either following installation best practices or hiring qualified professionals for complex configurations. Whether you're updating a single closet or renovating an entire home, The Barn Door Hardware Store offers the expertise, quality products, and support you need to bring your vision to life with confidence.
