You've probably walked into a friend's home and stopped in your tracks when you spotted a beautiful sliding barn door gliding effortlessly across a bedroom entrance or pantry. There's something undeniably captivating about barn door sliding systems. They blend rustic charm with modern functionality, creating statement pieces that actually solve real problems. Whether you're working with a cramped hallway where a traditional swinging door just won't cut it, or you're looking to add character to a builder-grade home, barn door sliding offers a solution that's both practical and visually striking.
Why Barn Door Sliding Became America's Favorite Space-Saving Solution
Remember when Joanna Gaines started featuring barn doors in nearly every Fixer Upper episode back in the mid-2010s? That wasn't just a passing trend. It sparked a nationwide realization that we'd been dealing with awkward door swings for far too long.
My neighbor Sarah faced a classic problem in her 1950s ranch home. The hallway bathroom door opened directly into the narrow corridor, creating a daily obstacle course for her family of four. Every morning became a choreographed dance of "wait, let me close the door so you can get past." After installing a barn door sliding system, she gained back nearly 10 square feet of functional hallway space. The door now glides parallel to the wall, and her kids can actually pass each other without incident.
The Real-World Problems Barn Door Sliding Solves
Space constraints aren't the only issue these systems address. Think about these common scenarios:
- Awkward room layouts where traditional doors block furniture placement or traffic flow
- Accessibility concerns for family members who struggle with round doorknobs or heavy swinging doors
- Style mismatches in homes where every door looks builder-basic and boring
- Privacy needs in open-concept spaces that lack clear room divisions
- Ventilation control in areas where you want partial privacy without completely closing off airflow
The American Architectural Foundation showcases numerous sliding barn door applications that demonstrate how versatile these systems have become across different architectural styles.

Choosing the Right Barn Door Sliding Hardware for Your Project
Here's where many DIY enthusiasts stumble. They fall in love with a door slab at the salvage yard or home center, then realize they have no idea what hardware they actually need. Let me save you from that headache.
The hardware selection process starts with three critical measurements:
- Door weight (use a bathroom scale if needed)
- Door thickness (typically 1-3/8" to 1-3/4" for interior applications)
- Opening width (measure the actual wall space, not just the doorframe)
When my cousin Jake renovated his downtown loft last year, he bought a gorgeous reclaimed wood door from an architectural salvage shop. Beautiful piece, probably weighed 180 pounds. He nearly purchased a standard hardware kit rated for 150 pounds. Disaster averted when the shop owner noticed and steered him toward heavy-duty hardware instead.
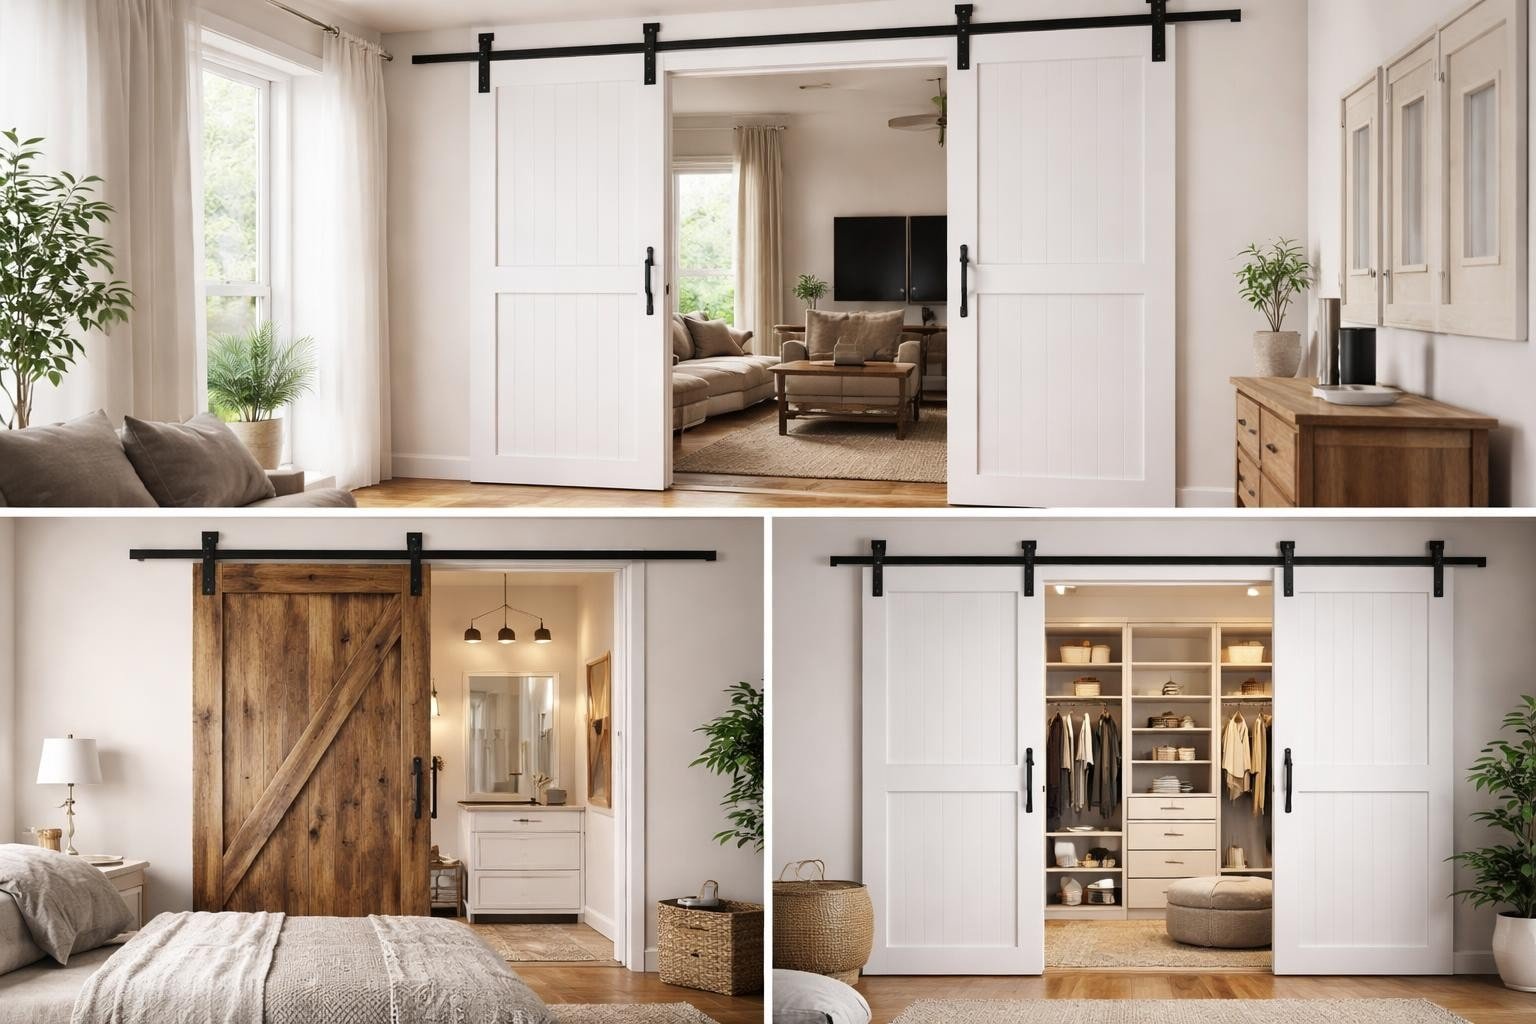
Hardware Styles That Define Your Aesthetic
Your hardware choice isn't just functional, it's a major design statement. Different roller and track styles communicate completely different vibes.
| Hardware Style | Best For | Visual Impact | Weight Capacity |
|---|---|---|---|
| Classic J-Strap | Traditional, farmhouse, rustic | Bold, visible curved brackets | Up to 200 lbs |
| Hidden Roller | Contemporary, minimalist, modern | Streamlined, reduced hardware visibility | Varies by model |
| Industrial Strap | Urban loft, eclectic, industrial | Heavy-duty metal presence | 200+ lbs |
| Decorative Box Rail | Transitional, elegant, refined | Enclosed track with detailed end caps | Up to 200 lbs |
The Classic J-Strap Barn Door Hardware Kit represents the quintessential barn door sliding aesthetic that most people picture when they imagine this style. That curved J-bracket design has defined the farmhouse look for generations, and it works equally well in a 1920s bungalow or a brand-new construction home.

Installation Reality Check: What Nobody Tells You Beforehand
Every home improvement show makes barn door sliding installation look like a 30-minute project. In reality? Plan for a full afternoon if you're moderately handy, or a full day if you're learning as you go.
Do it Best provides a comprehensive step-by-step installation guide that walks through the entire process with realistic timeframes and tool requirements.
The Critical Pre-Installation Checklist
Before you even unbox your hardware kit, verify these essential elements:
Wall Structure Requirements:
- Solid backing material (wood header board or metal studs, minimum)
- Proper stud spacing and locations marked clearly
- Wall surface rated to support both hardware and door weight
- Adequate clearance above doorframe (typically 6-8 inches minimum)
Door Preparation Steps:
- Verify door is flat and not warped (lay it on a level surface)
- Pre-drill all roller mounting holes to prevent splitting
- Sand all edges smooth to prevent catching on trim
- Apply finish before installation (much easier than finishing while mounted)
My brother-in-law learned this lesson the hard way. He mounted his track, hung his unfinished door, then realized he needed to stain and seal it. Taking everything down, waiting for finish to dry, then reinstalling everything added three days to his project timeline.
Design Approaches That Make Barn Door Sliding Work in Any Space
One of my favorite aspects of barn door sliding systems is their chameleon-like ability to adapt to virtually any design style. I've seen them work beautifully in ultra-modern minimalist apartments and century-old farmhouses alike.
Contemporary and Minimalist Spaces
In modern interiors, you want your barn door sliding hardware to whisper, not shout. Choose systems with clean lines and minimal ornamentation. Hidden roller configurations work exceptionally well here because they reduce visual clutter while maintaining the space-saving functionality.
A client of mine installed barn doors in her downtown condo, a space filled with concrete floors, white walls, and mid-century modern furniture. We selected matte black hardware with a hidden roller design and paired it with a simple flush-panel door painted in a soft gray. The result looked intentional and sophisticated, not rustic.
Rustic and Farmhouse Aesthetics
This is barn door sliding's home territory, where traditional hardware designs truly shine. Embrace the visible metal components, the industrial brackets, and the substantial track presence.
Consider these authentic rustic combinations:
- Reclaimed barn wood doors with oil-rubbed bronze hardware
- Rough-sawn pine paired with hammered metal straps
- Whitewashed wood planks with matte black industrial tracks
- Natural wood with visible knots and antique-finish hardware

Transitional Spaces That Blend Both Worlds
Maybe you're like most homeowners, somewhere between the Fixer Upper farmhouse look and the ultra-sleek modern aesthetic. Transitional design is your sweet spot, and barn door sliding works beautifully here too.
The trick is choosing hardware that reads as refined rather than either too industrial or too rustic. Box rail systems or simple strap designs in brushed nickel or aged bronze hit that perfect middle ground. Pair them with clean-lined doors in medium wood tones or painted finishes that complement your existing trim.
Measuring and Planning for Barn Door Sliding Success
Getting the measurements right makes the difference between a professional-looking installation and a frustrating do-over project. You'll need three key measurements to ensure proper function and clearance.
Track Length Calculation: Your track should be at least twice the width of your door opening, plus an additional 4-6 inches for hardware clearance. For a 36-inch doorway, you'll want a minimum track length of 76-80 inches.
Height Considerations: Most barn door sliding installations require 6-8 inches of clearance above your doorframe for the track and roller assembly. Measure your ceiling height carefully, especially in older homes where ceilings might not be perfectly level.
Wall Space Requirements: The door needs someplace to slide when open. Measure the wall space to one side of your doorway. If you have a light switch, outlet, or piece of furniture in the way, you might need to adjust your plan or consider a bifold configuration instead.
Understanding door hardware specifications helps you select components that match your specific installation requirements.
Bifold Barn Door Sliding: The Game-Changer for Tight Spaces
What happens when you love the barn door sliding concept but literally don't have enough wall space for the door to slide open fully? Enter bifold barn door systems, the ingenious solution that combines folding doors with sliding track hardware.
I recently helped my sister install a bifold barn door on her walk-in closet. The bedroom layout placed a window on one side of the closet opening and a dresser on the other, leaving no clear wall space for a standard sliding barn door. The bifold system solved this perfectly. The two door panels fold at the center point, then the entire folded assembly slides to one side, requiring only half the wall space of a traditional barn door sliding setup.
When Bifold Makes Sense
Think about bifold barn door sliding for these specific scenarios:
- Closet openings with limited adjacent wall space
- Pantries in galley kitchens where every inch matters
- Laundry rooms where you want the door to disappear completely
- Any doorway where you have about 12-18 inches of wall clearance on one side
The installation complexity increases slightly with bifold systems, but the space-saving benefits often make it worthwhile.
Exterior Barn Door Sliding Applications
While most people think of barn door sliding as an interior feature, exterior applications are gaining serious traction. We're seeing them on pool houses, garden sheds, workshop entrances, and even as unique garage door alternatives.
Do it Best offers detailed guidance on exterior barn door installation that addresses weatherproofing and outdoor-specific hardware requirements.
Exterior barn door sliding presents unique challenges you won't face indoors:
Weather Resistance Needs:
- Stainless steel or powder-coated hardware to prevent rust
- Proper flashing above the door opening
- Ground clearance to prevent water pooling
- Weather-sealed edges and bottom sweep installation
Structural Considerations:
- Heavier-duty track systems rated for wind loads
- Secure mounting into solid framing or masonry
- Additional bracing for larger door sizes
- Potential for seasonal expansion and contraction
My neighbor Tom installed barn doors on his detached garage workshop last spring. He chose stainless steel hardware and cedar door panels sealed with marine-grade varnish. Eight months later, through a Chicago winter, everything still operates smoothly. The key was investing in proper exterior-rated components from the start.
Maintaining Your Barn Door Sliding System for Long-Term Performance
Installation is just the beginning of your barn door sliding journey. Proper maintenance keeps everything gliding smoothly for years to come. The good news? These systems require surprisingly little upkeep compared to traditional hinged doors.
Quarterly Maintenance Tasks
Every three months, spend 15 minutes on these simple tasks:
- Clean the track with a vacuum attachment to remove dust and debris
- Wipe down rollers with a dry cloth (avoid lubricants that attract dirt)
- Check all mounting screws and tighten any that have loosened
- Inspect door alignment and adjust if it's sitting crooked
Annual Deep Maintenance
Once a year, do a more thorough inspection:
- Remove the door completely and inspect roller assemblies
- Check track for any bending or warping
- Verify wall mounting integrity (especially important for heavy doors)
- Apply a dry lubricant if recommended by your hardware manufacturer
Quality hardware from manufacturers who stand behind their products makes maintenance even easier. The limited lifetime warranty offered by reputable suppliers demonstrates their confidence in long-term durability.
Common Barn Door Sliding Mistakes and How to Avoid Them
After watching countless DIY installations (and a few professional mistakes too), I've identified the most frequent errors that create problems down the road.
Mistake #1: Inadequate Wall Support
This is the big one. Mounting your track directly into drywall with toggle bolts might hold for a few months, but it's a disaster waiting to happen. Always install a solid wood header board across the entire track length, secured directly into wall studs. This distributes the weight properly and prevents sagging.
Mistake #2: Ignoring Clearance Requirements
Every hardware system has specific clearance specifications. Door too close to the ceiling? It won't roll smoothly. Track mounted too close to the doorframe? The door will hit the trim. Check the sliding door track specifications before drilling a single hole.
Mistake #3: Choosing Style Over Function
That beautifully ornate hardware might look amazing in the showroom, but does it actually support your door weight? Does the roller design work with your door thickness? Function must drive the decision, with style as a close second.
Mistake #4: Skipping Door Prep
Hanging a warped, unfinished, or improperly drilled door creates ongoing frustration. Take the time to prepare your door correctly before installation. Flat, properly finished, and accurately drilled doors make everything else easier.
Barn Door Sliding in Unexpected Places
The most creative applications I've seen go far beyond simple bedroom or bathroom doors. Homeowners and designers are discovering that barn door sliding principles work brilliantly in unexpected contexts.
Room Dividers and Flexible Spaces
Large barn doors (or multiple doors on the same track) create dynamic room dividers in open-concept homes. I visited a home last month where the homeowners installed three 30-inch doors on a 10-foot track between their kitchen and dining room. They can stack all three doors to one side for fully open entertaining, close one for subtle division, or close all three for complete separation.
Media and Storage Solutions
Barn door sliding works surprisingly well for:
- Entertainment centers where doors slide to hide the TV when not in use
- Pantry cabinets in kitchens where traditional doors would block walkways
- Home office concealment in living spaces that need to look less cluttered
- Laundry area screening in open-plan homes
Creative Commercial Applications
Restaurants, retail shops, and office spaces are embracing barn door sliding for both function and aesthetic impact. Coffee shops use them for bathroom entrances that reinforce their industrial-chic vibe. Boutiques install them as dressing room doors. Corporate offices employ them to divide conference spaces.
The Cost Breakdown: What to Budget for Barn Door Sliding Projects
Let's talk numbers, because this question comes up constantly. What does a barn door sliding project actually cost?
Hardware Kit Investment:
| Component | Budget Range | Mid-Range | Premium |
|---|---|---|---|
| Track and Rollers | $150-250 | $250-400 | $400-700+ |
| Door Slab | $100-250 | $250-500 | $500-1200+ |
| Installation Supplies | $30-75 | $75-150 | $150-250 |
| Total DIY | $280-575 | $575-1050 | $1050-2150+ |
Professional installation typically adds $200-500 depending on your location and project complexity.
Where to Invest and Where to Save
Invest in quality hardware. This isn't the place to cut corners. Reliable rollers, sturdy track systems, and proper mounting hardware ensure smooth operation for years. Cheap hardware creates ongoing frustration and often needs replacement within 12-24 months.
Consider DIY door building. If you're handy, building your own door from lumber costs significantly less than buying pre-made slabs. You'll get exactly the size, style, and finish you want while saving hundreds.
Shop smart for materials. Track down free shipping options from suppliers who understand that barn door hardware is heavy and shipping costs can make or break your budget.
Troubleshooting Common Barn Door Sliding Issues
Even with perfect installation, you might encounter occasional issues. Here's how to diagnose and fix the most common problems.
Door Won't Glide Smoothly:
- Check for debris in the track (most common cause)
- Verify rollers aren't over-tightened
- Confirm door is hanging plumb and not binding against wall or floor
- Inspect for damaged or worn rollers
Door Sits Crooked:
- Adjust roller heights individually (most systems have adjustment mechanisms)
- Check that track is level (use a long level to verify)
- Verify wall header board isn't sagging under door weight
Door Swings Away from Wall:
- Install floor guides to keep the bottom of the door aligned
- Add anti-jump blocks at track ends to prevent the door from sliding off
- Consider adding a wall-mounted door stop
Excessive Noise During Operation:
- Clean track and rollers thoroughly
- Check for loose hardware vibrating during movement
- Verify door isn't dragging on floor or catching on trim
Barn door sliding transforms how you think about interior doors, turning a purely functional element into a design feature that actually improves how your home works. From space-constrained hallways to creative room dividers, these systems offer solutions that traditional swinging doors simply can't match. When you're ready to start your barn door project with hardware built to last, The Barn Door Hardware Store combines American-made quality with expert support and free shipping across the continental US, backed by a limited lifetime warranty that demonstrates their commitment to your long-term satisfaction.
