By Evan Christensen · Owner, The Barn Door Hardware Store
Published March 10, 2026 · Updated April 2026
Evan has owned and operated The Barn Door Hardware Store since 2016, specializing exclusively in sliding barn door hardware. Track installation is the step that determines everything else — a level track means a smooth door; a sloped one means a door that drifts. He and the team are available 7 days a week at info@thebarndoorhardwarestore.com.
Getting a barn door to slide smoothly and stay level long-term comes down almost entirely to how the track is installed. The door, the hardware finish, the roller style — none of it matters if the track isn't level and securely mounted. This guide walks through the full installation process, from measuring and mounting the header board to hanging the door and installing the floor guide. It's the track-focused companion to our broader how to hang a barn door guide — start there if you want the whole job end to end.
Before you start, download the instruction manual for your specific kit from our instruction manuals page. The steps below apply to standard single-track installations — the principles are the same across configurations, but the specific measurements and component details will vary by kit. If you're still choosing or sizing your track, start with our sliding door track guide, which covers track length, configuration, and hardware tiers before you install.
What you'll need
You'll need these tools before you start — having everything ready before you pick up the drill saves a lot of back-and-forth:
| Tool | Why you need it |
|---|---|
| 4-foot level | Anything shorter may miss a gradual slope along the track length |
| Stud finder | The track must hit solid framing — drywall alone won't hold |
| Drill with bits | Pilot holes prevent wood splitting; bit size must match your lag screws |
| Tape measure | Precision here prevents problems at every step after |
| Pencil | Mark positions before drilling — easier to correct than holes |
| Socket wrench or hex key | For tightening lag screws and hanger adjustment bolts |
| Notepad | Write measurements down — it's easy to lose track mid-install |
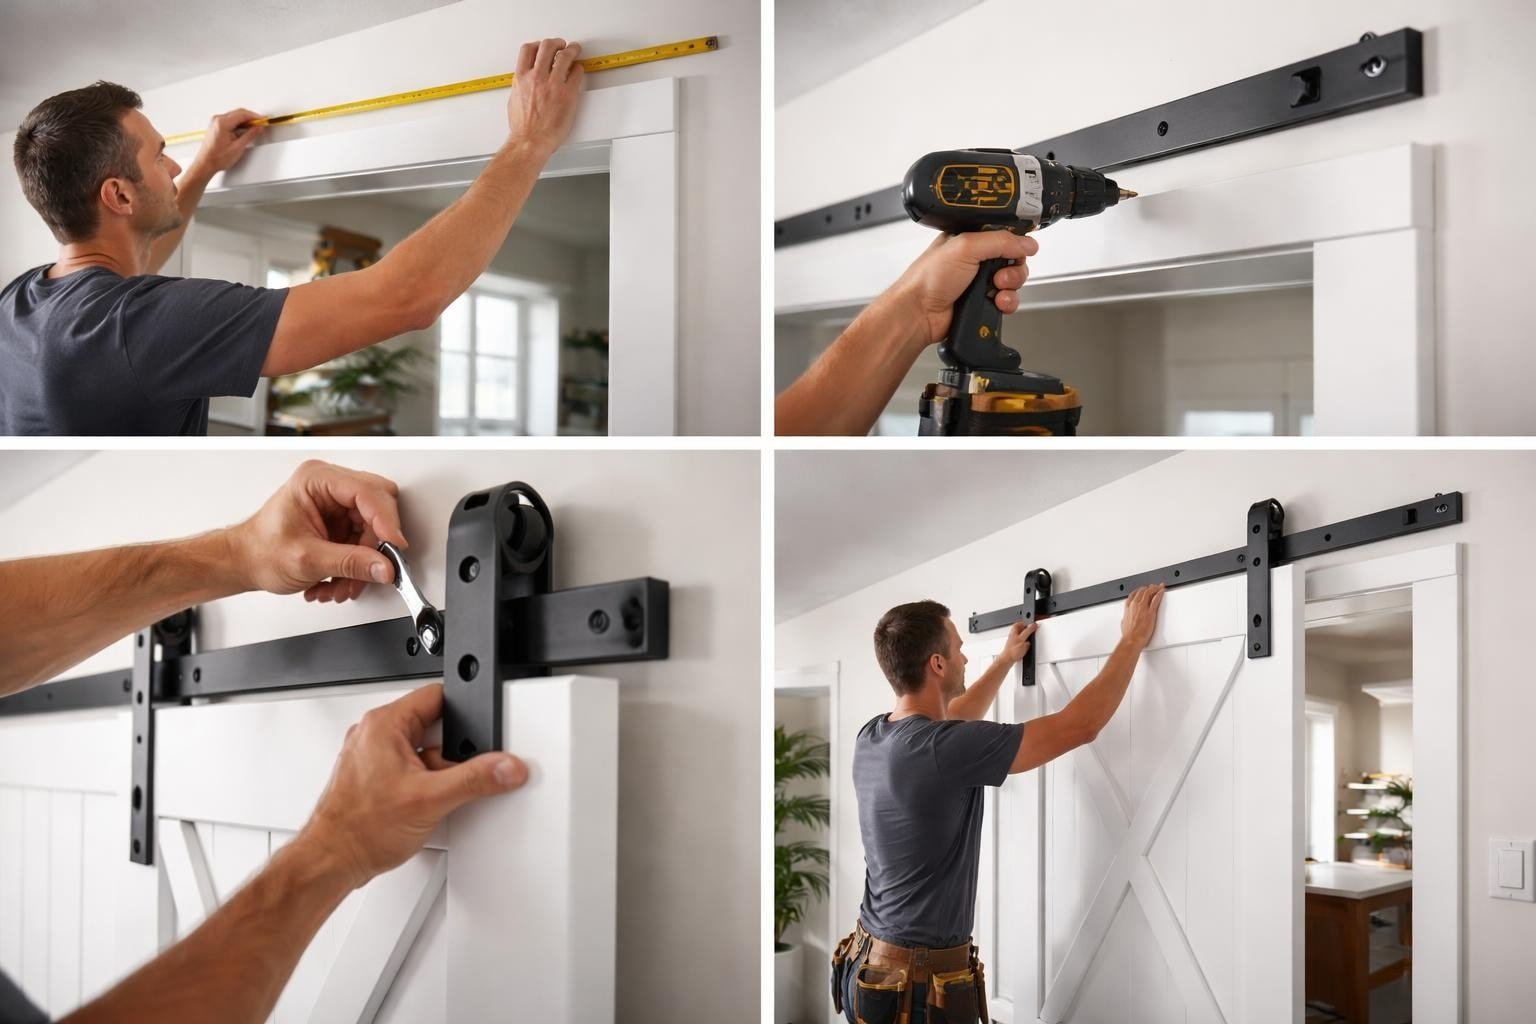
Step 1: Measure your opening and calculate track position
Before anything goes on the wall, get your measurements right. Errors here affect every step that follows.
Measure the door width, height, and thickness and write them all down. Then measure the wall space beside the opening — you need at least the full door width of clear wall on the slide side for the door to fully clear the opening.
Track length for a single sliding door should be at least twice the door width. A 36" door needs a 72" track minimum. This allows the door to slide completely clear of the opening.
Track height position isn't a single universal formula — the correct centerline height depends on your specific hardware, and each figure already accounts for the 3/8" floor gap built into the design. Use the figure for your kit as a starting reference:
| Hardware | Track centerline height |
|---|---|
| Goldberg Brothers standard duty | Door height + 1-1/2" |
| Goldberg Brothers heavy duty | Door height + 1-3/4" |
| Quick Ship | Door height + 2" |
Each of these positions the bottom of the door about 3/8" above the floor when hung. Don't build your own additive formula out of roller height plus clearance — confirm the exact centerline figure for your specific kit in its instruction manual, since it varies by hanger style.
Step 2: Prepare the mounting surface
Drywall alone cannot support the weight of a sliding barn door over time. You need to mount into solid framing — either wall studs or a header board secured into studs.
Use a stud finder to locate studs across the full track span. Mark each one with a pencil. If the studs don't align with where you need the track — or if you're working with plaster, old lath, or any wall surface where studs are difficult to locate — install a header board first.
Installing a header board:
A header board gives you a continuous solid mounting surface along the full track length. Use a 1×6 hardwood board — oak, maple, or poplar (not pine, which is too soft to hold lag bolts under sustained load). A 1×6 is the minimum for every installation; wider boards (1×8, 1×10) are an aesthetic choice, not a structural upgrade.
Cut the board to the full track length. Locate studs across the span, pre-drill holes through the board at each stud location, then hold the board at the correct height and mark its position on the wall. Secure it into the studs with 3/8" × 3" lag bolts — never into drywall alone. Check level before final tightening. Paint or finish the board to match your wall if preferred — a contrasting board can also become a deliberate design feature.
Step 3: Mount the track
With the mounting surface ready, hold the track against the wall at the calculated height and do a dry fit first — don't drill yet. This lets you check for clearance issues (trim, outlets, switches in the slide path) before committing to holes.
Place your 4-foot level on top of the track. Check the full length, not just one end. Even a very slight slope will cause the door to drift open or closed on its own once hung — this is the most common post-installation complaint we hear, and it's almost always a track level issue.
Once the position is confirmed:
- Mark mounting hole positions through the track onto the header board or studs
- Drill pilot holes at each marked position using the correct bit size for your lag screws — check your kit manual
- Position the track and insert lag screws by hand first
- Check level one more time before tightening
- Tighten fasteners from the center outward — tightening from the ends inward can introduce a bow into the track
- Recheck level after tightening
Place door stoppers at both ends of the track as directed in your kit manual. These prevent the door from sliding off the track.
Step 4: Attach hangers to the door
Barn door hardware uses one of two hanger types — face-mounted or top-mounted — depending on the kit.
Face-mounted hangers (J-strap, straight strap, spoke wheel styles) bolt through the door face. Position each hanger 3"–4" from the door edge for balanced weight distribution. Mark positions carefully, drill pilot holes to prevent wood splitting, insert carriage bolts from the decorative face of the door, attach the hanger plate on the back, and tighten with washers and nuts.
Top-mounted hangers attach to the top edge of the door rather than the face — useful for ornate or decorative doors where you can't put a bolt through the face, or where the door surface needs to be preserved. Position and drill as directed in your kit manual, attach the mounting plates, and insert adjustment bolts without fully tightening — you'll need room for vertical adjustment after hanging.
Door width determines how many hangers you need. Two hangers are fine for doors up to 48" wide. Between 48" and 60", a third centered hanger is optional. Above 60" wide, a third hanger is required to properly support the door and keep it from sagging over time.
Step 5: Hang the door
You'll want a second person for this step. A barn door is awkward to maneuver and hold steady while threading rollers onto a track — particularly for heavier solid wood doors.
Lift the door so the rollers align with the track. Most systems allow you to tilt the rollers at an angle to engage them with the track, then straighten once they're seated. Slide the door along the full track length to check for smooth operation before making any adjustments.
Step 6: Level and adjust the door
Your door probably won't hang perfectly level on the first try — that's normal. This is what the hanger adjustment bolts are for.
Place a level on the face of the door. Identify which side is low. Locate the adjustment bolt on the hanger above that side — typically a hex bolt — and turn it to raise the door on that side. Make small adjustments and recheck with the level each time. The bolts on opposite hangers work in opposite directions, so raising one side while checking the other is the fastest way to get it level.
| What you see | What to check | How to fix |
|---|---|---|
| Door tilts — one edge low | Hanger adjustment bolts | Adjust bolt on low side to raise it |
| Door drifts open or closed | Track not level | Loosen track screws, re-level, retighten |
| Door drags on floor | Clearance too low | Raise both hangers equally |
| Door catches while sliding | Debris in track, or track bowed | Clean track; check tightening pattern |
Step 7: Install the floor guide
The floor guide keeps the bottom of the door from swinging away from the wall. Don't skip this — without it the door will drift outward and eventually bang into furniture or walls, especially in any space with air movement.
Close the door and mark the floor position directly below the center of the door panel. Open the door and install the guide at that mark. The guide should contact the door edge lightly — enough to prevent swing without creating friction during the slide.
Important: If your flooring is finished hardwood, tile, LVP, or anything you'd rather not drill into, you need a wall-mounted floor guide rather than a floor-mounted one. A wall-mounted guide performs the same function from the baseboard. This is the most commonly missed accessory in barn door installations — browse our floor guide collection for both floor-mounted and wall-mounted options.
For a full walkthrough of floor-guide styles and step-by-step floor-guide installation, see our barn door bottom guide.

Step 8: Test and final check
Slide the door the full length of the track several times. It should move smoothly with consistent effort throughout — no catching, no drifting, no swing. Check that the door stops are positioned so the door fully clears the opening but can't slide past the track end.
If anything isn't right, refer to our troubleshooting guide which covers every common post-installation issue and how to fix it.
Maintenance
Once installed, maintenance is simple:
Every month — wipe the track channel clean with a dry cloth. Check that the floor guide is still correctly positioned.
Every 3–6 months — check and retighten all mounting hardware.
Once a year — inspect the rollers for wear, recheck track level, and verify anti-jump disk clearance.
The rollers run on sealed bearings and are designed to run dry — don't apply silicone spray, WD-40, grease, or any other lubricant to the track or rollers. Lubricant attracts dust and debris, builds up in the channel, and actually increases rolling resistance over time. A sluggish or noisy door is almost always track debris or a level issue, not a lubrication need: wipe the channel with a dry cloth and confirm the track is level. If a roller is genuinely worn, replace it rather than lubricating it.
Need your kit's specific instructions?
Download the manual for your hardware kit from our instruction manuals page — we have manuals for every kit we carry, including single track, bypass, bifold, ceiling mount, and heavy duty configurations.
If you run into something the manual doesn't cover, email us at info@thebarndoorhardwarestore.com. We're available 7 days a week and happy to help you work through any installation question before or after your kit arrives.

Related guides:
- Sliding Door Track: How to Size, Mount, and Choose Right
- How to hang a barn door: the full step-by-step guide
- Common barn door problems and how to fix them
- Sliding barn door bottom guide: types and installation
- Barn Door Dimensions: Standard Sizes and Space Requirements
- Barn Door Accessories: Floor Guides, Handles & Locks
- How Much Does a Barn Door Cost?
