
Building a Sliding Barn Door: The Expert Guide for 2026
Sliding barn doors have taken the interior design world by storm in 2026, becoming a must-have feature for modern homes. If you’ve ever wondered about building a sliding barn door, you’re in the right place. This expert guide will walk you through every step, from smart planning to the final installation, to help you achieve a stunning, professional look.
Whether you’re a homeowner, a DIY enthusiast, or a contractor, you’ll find up-to-date techniques, practical advice, and inspiration for every style and budget. Inside, you’ll discover how to plan your project, choose tools and materials, construct the door, install hardware, add finishing touches, and troubleshoot common issues.
Ready to transform your space and boost your home’s value? Let’s dive in and start your barn door journey with confidence.
Planning Your Sliding Barn Door Project
Thinking about building a sliding barn door? Smart move. Planning is where every great project starts, and your choices now set the stage for a smooth build and stunning results. Whether you want to add privacy to a bedroom or make a bold statement in your kitchen, careful preparation ensures your door fits, functions, and looks fantastic.
Assessing Your Space and Needs
First up: get out your measuring tape. The success of building a sliding barn door relies on precise measurements. Measure your doorway's width and height, then check the surrounding wall space. You want enough room for the door to slide fully open without hitting furniture or trim.
Next, think about how much clearance you need above the door for the track, and on the side for smooth sliding. If you plan to use the door in a high-traffic area or for privacy, like a bathroom, be sure to factor in how the door will overlap the opening for better soundproofing and security.
Door size matters. For bedrooms, a standard 36-inch width works well, while pantries and closets might only need 24 to 30 inches. Bathrooms often require wider doors for accessibility. As you plan, consider the latest design trends for 2026. Minimalist styles, eco-friendly finishes, and sustainable materials are all the rage, according to Interior Doors Trends 2026. This is your chance to blend function with fashion.
Selecting the Right Design and Materials
Now for the fun part: picking your design. When building a sliding barn door, you'll find styles from classic farmhouse to ultra-modern. Do you want a rustic, weathered wood look or a sleek, industrial vibe? Your choice should match both your taste and your home's character.
Wood is the most popular material, but not all woods are equal. Here's a quick comparison:
| Wood Type | Durability | Look | Cost |
|---|---|---|---|
| Pine | Moderate | Rustic | Low |
| Oak | High | Traditional | Medium |
| Reclaimed Wood | Varies | Unique | Medium-High |
If you live in a humid climate, consider hardwoods like oak or engineered panels to prevent warping. Want something unique? Add glass inserts or metal accents for a custom touch. Trending finishes for 2026 include matte black hardware, soft neutral stains, and textured surfaces. Always match your materials to the room's needs and your lifestyle, ensuring your barn door stands the test of time.
Budgeting and Timeline
Let's talk numbers. The cost of building a sliding barn door can range from $300 to $1,200, depending on your choices. Materials like premium wood or custom hardware will push the price higher, while DIY solutions and basic kits help save money.
Break your budget into parts: wood or panels, hardware kit, tools, and finishing supplies. A typical breakdown might look like this:
- Wood and panels: $100–$400
- Hardware kit: $100–$300
- Tools and fasteners: $50–$200
- Paint, stain, or finish: $30–$100
If you're handy, expect to spend a weekend or two on the build. Professionals might finish in a day, but scheduling and delivery can add time. To avoid surprises, add a buffer for delays or extra supplies.
Look for ways to save without sacrificing quality. Shop sales, compare local vs. online prices, and consider eco-friendly offcuts for smaller doors. With careful planning, building a sliding barn door becomes an achievable, rewarding project for any skill level.
Tools and Materials Checklist
Planning your project for building a sliding barn door starts with having the right tools and materials on hand. Getting this step right means your DIY journey will be smoother and more enjoyable. Let’s break down what you’ll need for a professional-quality result.

Essential Tools for Building and Installation
When it comes to building a sliding barn door, having the right tools is crucial. You’ll want to gather these essentials before you start:
- Drill (preferably cordless for flexibility)
- Circular saw or track saw for straight, clean cuts
- Level for accurate alignment
- Measuring tape (at least 10 feet)
- Clamps for holding pieces steady
- Carpenter’s square for perfect corners
- Screwdriver set (manual or powered)
Power tools speed up the process and offer more precision, while hand tools give you greater control for finer details. Don’t forget safety gear. Always wear gloves, goggles, and ear protection to keep your workspace safe and comfortable.
If you’re new to building a sliding barn door, practicing with your tools on scrap wood can boost your confidence before you tackle the real thing.
Materials Needed
Gathering quality materials is the backbone of building a sliding barn door that lasts. Here’s a checklist to keep you on track:
- Wood panels (pine, oak, or reclaimed wood)
- Barn door hardware kit (track, rollers, guides, stops)
- Fasteners (screws, bolts, anchors)
- Handles or pulls
- Floor guides and anti-jump blocks
- Wood glue and filler
- Sandpaper (multiple grits)
- Finish, paint, or stain suited to your style
Choosing durable hardware is just as important as selecting beautiful wood. Look for kits designed for the weight and size of your door. For those interested in sustainability, consider eco-friendly stains or reclaimed wood. If you want more detail on what each piece of hardware does, the Sliding Barn Door Hardware Guide offers a helpful, in-depth overview.
Mixing wood tones or adding glass and metal accents can help your sliding barn door reflect your personal style.
Sourcing Materials
Finding the right materials for building a sliding barn door is easier than ever. Local hardware stores and lumber yards are great for inspecting wood quality in person. Specialty barn door suppliers often offer unique hardware or reclaimed wood you might not find elsewhere.
Online shopping can save time and often provides a wider selection, but always check reviews and verify authenticity before buying. Some suppliers, like The Barn Door Hardware Store, offer free shipping, a limited lifetime warranty, and expert support to help you choose the perfect options.
Before purchasing, inspect wood for warping or splits and verify that hardware is rated for your door’s size and weight. Planning ahead and sourcing quality materials will set you up for a barn door that’s both beautiful and built to last.
Step-by-Step: Building Your Sliding Barn Door
Ready to roll up your sleeves? This is where the magic happens! In this section, you’ll get a clear, actionable breakdown of building a sliding barn door from scratch. Whether you’re a seasoned DIYer or a first-timer, each step is crafted to help you achieve professional results, avoid common pitfalls, and enjoy the process along the way.

Preparing and Cutting the Door Panels
Let’s start with the foundation: your panels. The first step in building a sliding barn door is choosing the right wood. Pine, oak, or reclaimed wood are all solid picks, depending on your desired look and budget. Always check the boards for warping or knots that could weaken the finished door.
Before making any cuts, measure your doorway and add a few extra inches on each side for overlap. Mark your dimensions using a square for perfect angles. If you have access to a track saw, now’s the time to use it—this tool is ideal for straight, splinter-free cuts. For traditionalists, a circular saw with a fine-tooth blade will also do the trick.
Lay out all your panels and double-check the measurements. Remember, precision here will save you headaches later. If you’re aiming for a minimalist or modern look, use fewer wide panels. For a rustic vibe, try several narrower planks. Keep your workspace clean and organized to avoid mistakes or injuries during building a sliding barn door.
Assembling the Door Frame and Panels
Once your panels are cut, it’s assembly time. Start by laying out the stiles (vertical pieces) and rails (horizontal pieces) on a flat surface. Dry-fit everything before committing to glue or fasteners. This step lets you catch any alignment issues early.
For sturdy joints, use pocket holes or wooden dowels. Pocket holes are especially beginner-friendly and provide strong, hidden connections. Apply wood glue to all edges, then clamp the frame tightly. A few well-placed clamps will make sure the door stays square as the glue dries.
Double-check for square using a carpenter’s square. If you want extra reinforcement, add a diagonal brace or cross-buck for both style and strength. This is one of those details that can set your project apart, especially if you’re building a sliding barn door for a high-traffic area.
Before moving on, wipe away any excess glue with a damp cloth. Let the frame cure fully according to the glue manufacturer’s instructions. Taking your time here leads to a door that’s rock-solid and ready for years of use.
Sanding and Surface Preparation
Now it’s time to smooth things out—literally. Sanding is essential for both looks and functionality. Start with a coarse grit (around 80) to remove rough edges, then work your way up to a finer grit (up to 220) for a silky finish. Use a sanding block or orbital sander for flat surfaces, and hand-sand details or tight corners.
Pay special attention to knots, holes, or cracks. Fill these with wood filler and let it dry completely before sanding again. This creates a seamless look and preps the surface for your chosen finish. Dust is the enemy here, so vacuum and wipe down the door with a tack cloth before moving forward.
If you plan to add paint or stain, test your color on a scrap piece of wood first. This step ensures you’ll love the final look. Proper sanding and prep are crucial for building a sliding barn door that stands out and lasts for years.
Adding Decorative Elements and Custom Features
This is where your creativity shines. Want a classic barn look? Add a Z-brace or X-brace using thinner strips of wood. For modern flair, consider inlays, metal strips, or even glass inserts. Just make sure any decorative elements are securely attached and don’t interfere with the door’s movement.
Pre-drill holes for handles, pulls, or locks now, before finishing. This prevents splitting and ensures precise placement. If you’re working with reclaimed wood or mixing materials, double-check compatibility—some finishes or glues react differently depending on the material.
Consider integrating functional upgrades like chalkboard panels (great for kitchens or kids’ rooms) or soft-close mechanisms. Customizing your project is half the fun of building a sliding barn door and makes it uniquely yours.
Prepping for Hardware Installation
With your door assembled and decorated, it’s time for the final prep. Mark out the spots for all mounting hardware using the manufacturer’s templates. Use a level to ensure everything lines up perfectly—nothing ruins a beautiful door faster than crooked hardware!
Drill pilot holes where needed and dry-fit all components before final installation. This is a smart way to catch any alignment issues or obstructions in advance. For a deep dive into best practices, check out this guide on Installing a Barn Door Track for step-by-step hardware installation tips.
Once everything fits, remove the hardware and finish your door with paint, stain, or sealer as desired. Let it cure completely before attaching any hardware for good. This last bit of patience ensures your hard work pays off and your building a sliding barn door project ends with a flawless finish.
Installing the Sliding Barn Door Hardware
Ready for the most exciting part of building a sliding barn door? Installing the hardware brings your project to life, transforming those crafted panels into a functional, stylish entryway. In this section, you’ll learn how to select, install, and maintain barn door hardware for smooth, lasting performance. Let’s break it down, step by step.

Choosing the Right Hardware Kit
When it comes to building a sliding barn door, selecting the right hardware kit is crucial for both style and function. With the sliding door hardware market projected to see continued growth and innovation, it's important to stay up to date on the latest options. For a deeper look at how the market is evolving and which features are trending, check out this Sliding Door Hardware Market Analysis.
Before you buy, consider the type of door you’ve built and the space it will occupy. Will you need a single track, a bypass system for double doors, or perhaps heavy-duty hardware for a solid wood panel? Measure your door’s weight and size to match it with compatible rollers, tracks, and guides. Quality hardware will ensure your door glides smoothly and stands the test of time.
As you’re building a sliding barn door, factor in the finish and style of your hardware. Matte black, brushed nickel, and even brass are popular for 2026. Always look for kits with clear instructions, all necessary mounting pieces, and a solid warranty for peace of mind.
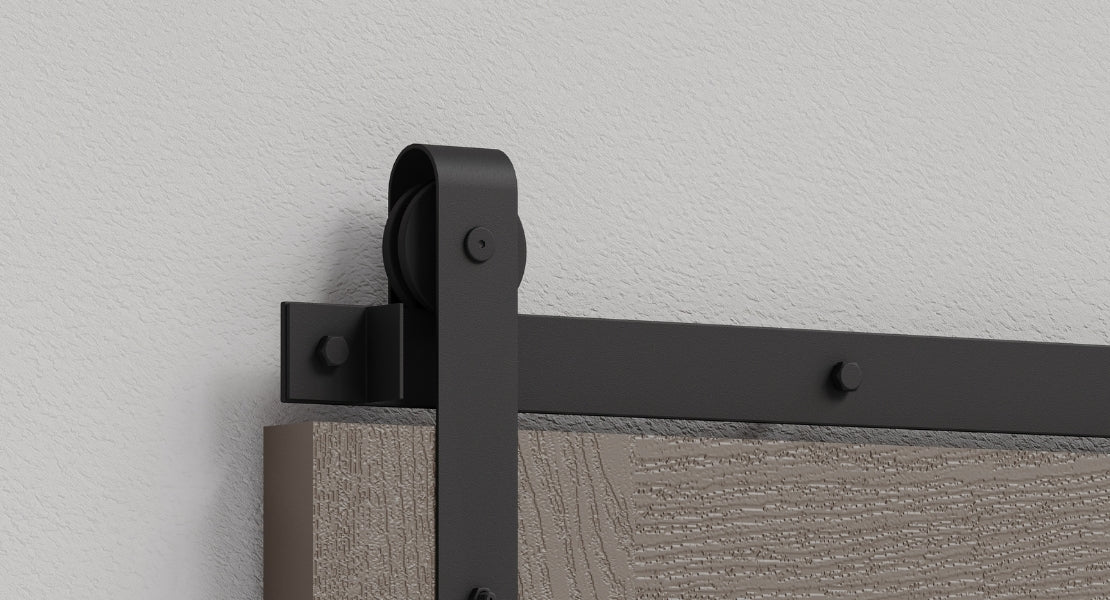
Installing the Track and Mounting Hardware
With your hardware kit in hand, it’s time to get hands-on. The first step in building a sliding barn door is securing the track to the wall. Always locate wall studs—this ensures the track can support the door’s weight safely. Use a stud finder and mark the anchor points with a pencil.
Mount the track at the right height so there’s enough clearance above the door, typically leaving at least an inch between the top of the door and the track. As you’re building a sliding barn door, check that the track is level using a spirit level. An uneven track can cause the door to roll poorly or wear out hardware faster.
Install the spacers and fasteners according to your kit’s instructions, tightening each screw but not overtightening. Double-check your work as you go, and dry-fit the rollers to ensure everything aligns before you hang the door. Remember, patience here pays off with a door that glides perfectly.
Hanging the Door and Adjusting for Smooth Operation
Once your track is up, you’re almost finished building a sliding barn door. Attach the hangers and rollers to the top of your door, following the kit’s layout. Most systems require pre-drilled holes for a secure fit. With a helper, lift the door and place the rollers onto the track gently.
Slide the door back and forth to test its movement. Adjust the stoppers and anti-jump blocks so the door can’t be lifted off accidentally. If you notice any sticking or uneven gaps, make small tweaks to the roller height or track alignment. This is a crucial part of building a sliding barn door, so don’t rush—smooth, quiet operation is the ultimate goal.
Finish by installing floor guides to keep the door stable and prevent swinging. Guides are especially important for wider doors or high-traffic areas. Take a final walk-through to confirm everything moves as it should.
Safety and Maintenance Considerations
Safety is key when building a sliding barn door. Always double-check that all mounting points are secure, and that the door has enough clearance to avoid pinched fingers or accidental bumps. For families with kids or pets, consider adding soft-close systems and locks for extra peace of mind.
Regular maintenance will extend the life of your hardware. Wipe down tracks, lubricate rollers with a silicone spray, and periodically check all fasteners for tightness. Well-installed barn doors can last over 20 years with minimal upkeep, making building a sliding barn door a smart investment in both style and function.
If you hear squeaks or feel resistance, address issues promptly to prevent bigger problems. A little preventative care goes a long way, ensuring your barn door remains a highlight of your home for years to come.
Finishing Touches and Troubleshooting
You're almost at the finish line with building a sliding barn door, but the last details make all the difference. Let’s dive into the final steps that ensure your project not only looks professional but functions beautifully for years to come.
Painting, Staining, or Sealing Your Door
The finish you choose is the cherry on top when building a sliding barn door. Want a rustic vibe, a bold pop of color, or a sleek matte look? Pick a paint, stain, or sealant that matches your style and protects your hard work.
Start by sanding the entire surface. Wipe away dust with a tack cloth. For stains, apply with the grain using a brush or rag, then wipe off the excess. Paint calls for even, thin coats with a quality brush or roller. Sealing is crucial for humid areas—use a water-based polyurethane for durability.
Matte finishes and eco-friendly stains are trending in 2026, perfect for modern interiors. Always let each coat dry fully before adding the next. This prevents streaks and ensures lasting beauty.
Installing Handles, Pulls, and Accessories
Handles and pulls are the jewelry of your barn door. Placement is key—measure from the floor for comfort and symmetry. Opt for stainless steel, matte black, or brass to match your décor. If you’re still unsure, check out these Choosing Stainless Steel Door Handles tips for the best fit and installation advice.
Accessories add both function and style. Floor guides keep your door gliding straight, while soft-close mechanisms protect fingers and walls. Flush pulls are great for tight spaces. Always pre-drill holes to avoid splitting the wood, and double-check alignment before securing hardware.
Common Issues and Expert Solutions
Even the best plans can run into a hiccup or two when building a sliding barn door. Luckily, most common problems have simple fixes. Here’s a quick troubleshooting table:
| Problem | Cause | Solution |
|---|---|---|
| Warping | Moisture imbalance | Reseal and adjust humidity |
| Sticking | Track misaligned or dirty | Clean track, realign guides |
| Uneven Sliding | Floor or wall guide issues | Adjust or replace guides |
| Excess Noise | Lack of lubrication | Oil rollers, add felt pads |
| Privacy Gaps | Door size or alignment | Add seals, check door width |
If your door wobbles or drags, revisit your guides. For expert advice, these Barn Door Wall Guide Tips can help you choose and install the right wall guide for smooth operation.
Upgrading and Customizing Over Time
One of the joys of building a sliding barn door is how easy it is to update. Want a fresh look next season? Swap out the handles or repaint in a trending color. Smart locks or soft-close upgrades add convenience.
Over time, inspect the finish for wear, especially in high-traffic areas. Sand and refinish as needed for a like-new appearance. Consider soundproofing strips for bedrooms or offices if privacy becomes a concern. With a little care, your barn door will stay stunning and functional for years.
Expert Tips for a Professional Finish
Want to make sure your sliding barn door really stands out? Achieving a professional finish comes down to details. From perfect alignment to keeping up with the latest trends, these expert tips will help you master building a sliding barn door with confidence.
Pro Techniques for Flawless Results
Getting that crisp, magazine-worthy look starts with precision. When building a sliding barn door, always double-check your measurements for both the door and the track. Use a level and a square to ensure every cut and joint lines up perfectly.
Jigs and templates are your best friends for repeatable accuracy. They help you drill holes and place hardware consistently, especially if you are making more than one door. For a seamless look, hide fasteners by using pocket holes or covering screw heads with wood filler before finishing.
- Double-check all measurements before cutting.
- Use a level and square for true alignment.
- Hide fasteners for a clean, modern appearance.
Perfect alignment and consistent gaps will make your project look truly professional. Remember, building a sliding barn door is all about attention to detail.
Maximizing Durability and Longevity
You want your hard work to last, right? The secret to a long-lasting sliding barn door is choosing the right materials and finishes. Opt for weather-resistant finishes if your door will be exposed to humidity or heavy use.
Reinforce mounting points with quality fasteners, and always anchor hardware into wall studs for maximum support. A quick routine inspection every few months can catch small issues before they become big problems.
- Choose weather-resistant paints or stains.
- Use heavy-duty fasteners and anchors.
- Inspect tracks and rollers for wear.
If you follow these steps while building a sliding barn door, you will enjoy smooth operation and lasting beauty for years.
Design Inspiration and Current Trends
Want your door to look fresh and stylish? Keep an eye on emerging design trends. In 2026, homeowners are leaning into minimalist and mixed-material barn doors, with bold matte finishes and industrial hardware stealing the spotlight.
Check out Sliding Barn Door Trends 2025 for a deep dive into the latest styles, from industrial chic to eco-friendly materials. Did you know that building a sliding barn door can actually boost your home's value? According to Remodeling Magazine, the average ROI sits at an impressive 85 percent.
- Minimalist and industrial styles are on the rise.
- Matte and bold finishes offer a modern touch.
- Mixed materials like wood and metal are trending.
Let your creativity lead the way and personalize your project to reflect your style.
Resources for Continued Learning
Learning never stops, especially with DIY projects. If you're passionate about building a sliding barn door, explore online tutorials, join forums, and connect with other enthusiasts. Video guides and step-by-step blogs offer practical tips for every skill level.
Consider following the latest market news, like the U.S. Barn Door Hardware Market Growth, to stay updated on new products and innovations. Sharing your experiences in DIY communities can help you troubleshoot and discover fresh ideas.
- Watch video tutorials for hands-on guidance.
- Join forums and social groups for support.
- Stay updated on new hardware and trend reports.
With the right resources, your journey in building a sliding barn door will only get better.
So, now that you’ve got the full scoop on planning, building, and installing your own sliding barn door, are you feeling inspired to dive in? Trust me, having the right hardware makes all the difference for a smooth and professional finish—and that’s where I always turn to The Barn Door Hardware Store. With their top notch selection, expert advice, free shipping, and a limited lifetime warranty, you can focus on creating a door that’s as stylish as it is sturdy. Ready to get started? Your perfect barn door project is just a click away!