By Evan Christensen · Owner, The Barn Door Hardware Store
Published February 27, 2026 · Updated June 2026
Evan has owned and operated The Barn Door Hardware Store since 2016. Floor guide questions are among the most common post-installation inquiries his team receives — usually because the included guide wasn't installed, or the wrong type was chosen for the flooring. He and the team are available 7 days a week at info@thebarndoorhardwarestore.com.
A floor guide is not an optional accessory. Every barn door hardware kit we sell includes one, and it needs to be installed as part of every installation. Without it, the bottom of the door has no lateral constraint — the door is only held at the top, which means any sideways force will cause it to swing away from the wall. A person opening the door, a pressure differential from HVAC, or a draft can all cause an unguided door to swing and contact the wall. It's also a wear issue: when the bottom drifts, the top rollers and track absorb side loads they aren't built for, which shortens hardware life. The guide keeps the door tracking straight so the rollers stay at the correct angle.
The floor guide question isn't whether you need one — you do. The question is which type is right for your flooring situation and whether you need the one included in your kit or a different option.
Floor guide types
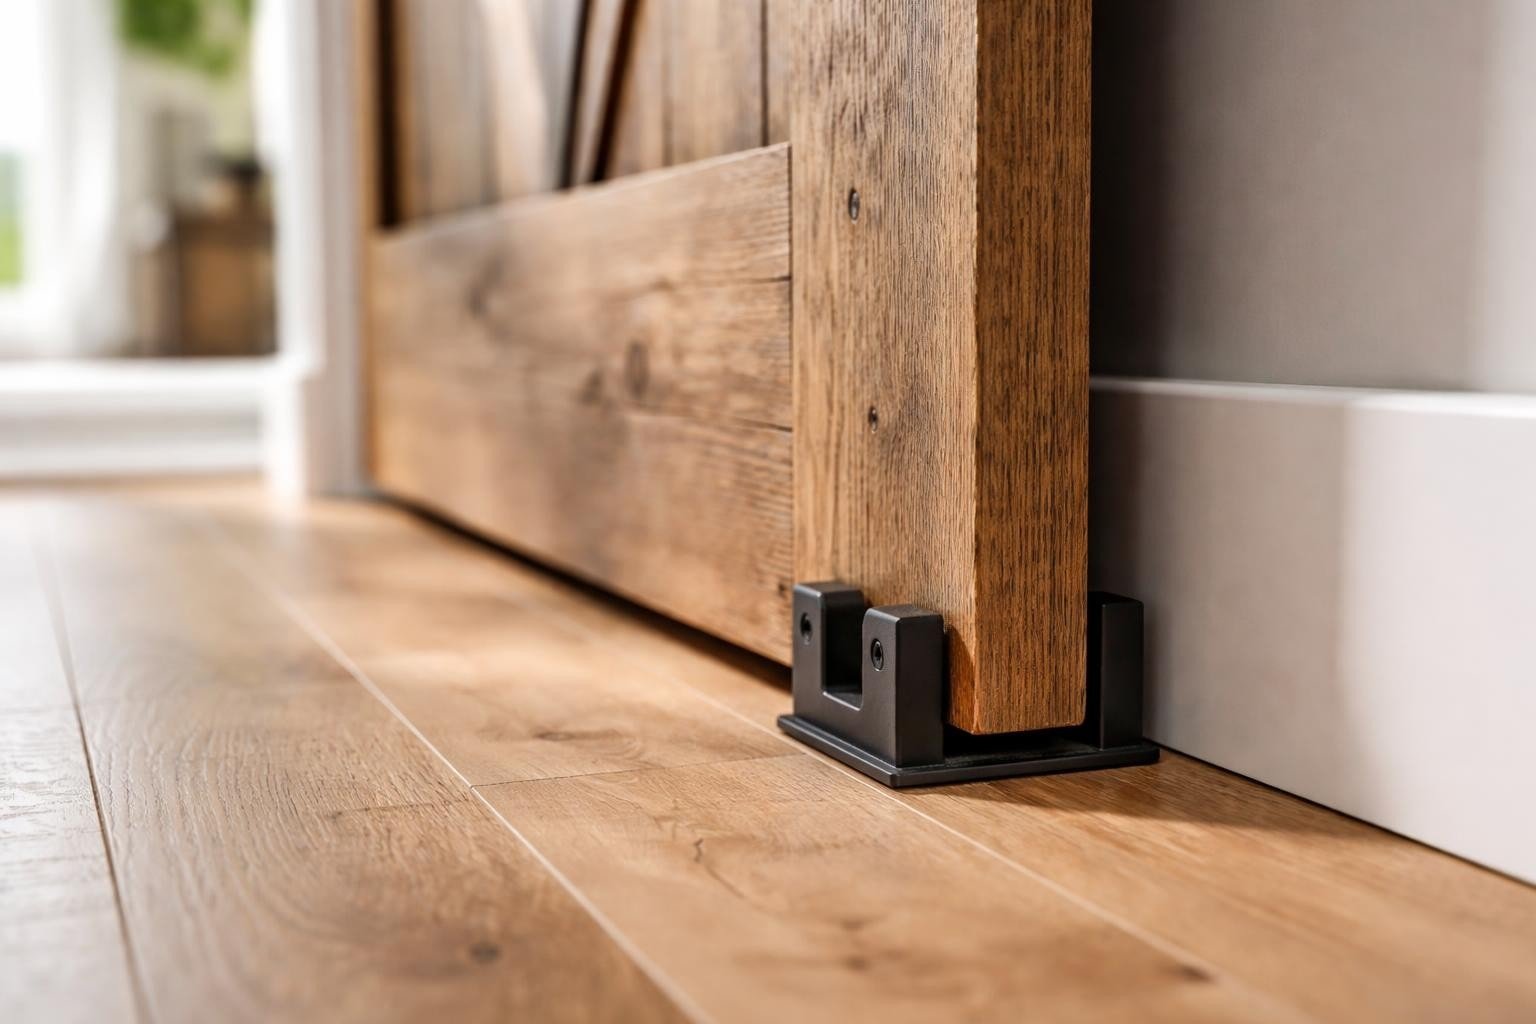
T guide — floor-mounted (included in most kits)
The T guide is included with most hardware kits and is the most common floor guide type. A T-shaped bracket mounts to the floor below the door's travel path; the bottom edge of the door has a slot routed into it, and the T bracket rides in that slot as the door slides. Because the bracket sits inside the door bottom rather than hugging the door face, it's nearly invisible in use and sits flush with the floor — no projection that would catch a foot.
T guides mount to the floor only. If you need a wall-mounted option, we carry wall-mounted floor guides that work the same way but are a different product.

Wheeled floor guide
A wheeled floor guide wraps around the door edge and uses small wheels that compress against the door face, keeping it laterally constrained. Because the wheels make continuous contact rather than sitting in a slot, there's no impact-and-release cycle — which makes it significantly quieter than a T guide for doors that rattle.
The tradeoff: the wheeled guide projects past the door face at floor level, creating a low protrusion that can be a tripping hazard in high-traffic areas. Position the wheels to contact the door with light compression — enough to prevent swing without creating noticeable drag when sliding. For rattle reduction specifically, the guide can be tightened further, but this adds resistance to the slide. For most installations where swing prevention is the only goal, the T guide is the better choice. The wheeled guide is best when rattle is a specific problem.

Wall-mounted floor guide
Wall-mounted floor guides attach to the wall or baseboard rather than the floor and provide the same lateral constraint. The right choice when you have finished hardwood, tile, LVP, or any flooring you don't want to drill into. Functionally identical to floor-mounted options — the only difference is where the guide mounts.
Several of our wall- and floor-mounted guides — including the U-style guides — adjust to fit different door thicknesses, so one guide works across a range of slab widths.

Continuous floor guide
A continuous floor guide uses a channel routed into the floor along the full length of the door's travel path. The guide bracket rides in the channel continuously with no transition points, making it the quietest and most invisible option — but also the most permanent. It requires routing a groove in the floor for the entire travel length, which is a significant installation commitment. The right choice for long travel distances where multiple T guides would create transition bumps, or for new construction where the floor can be routed before finish.

How to choose the right floor guide
| Situation | Right guide |
|---|---|
| Standard installation, any flooring you can drill into | T guide (included in kit) |
| Finished hardwood, tile, LVP, or flooring you won't drill into | Wall-mounted floor guide |
| Rattle is a specific problem and tripping hazard is acceptable | Wheeled floor guide |
| Long travel distance with multiple guide transition points | Continuous floor guide |
| Outdoor, shed, or coastal door | Stainless steel floor guide (the only outdoor-rated option) |
The most common situation where the included T guide doesn't work is finished flooring the customer doesn't want to drill into. If that's you, order a wall-mounted floor guide before your kit ships so you have everything at once. It's the single most frequently overlooked accessory after an order is placed.
Browse and compare every option — floor-mounted, wall-mounted, stainless, and continuous — in our barn door floor guides collection.
Installation and positioning
Every kit ships with step-by-step installation instructions specific to the hardware. Full installation guides are available for every kit on our site.
The one positioning principle worth emphasizing: the floor guide should be positioned where the door naturally hangs when closed, not where you want to force it. Close the door and observe where it settles naturally — that's where the guide belongs. A guide positioned to pull the door away from its natural hang will create constant friction and resistance during every slide.
For T guides: the slot in the door bottom needs to be routed to match the T bracket dimensions. This is done before installation and the dimensions are in the instruction guide. Don't skip this step — a T guide without a proper slot won't constrain the door correctly.
For bypass configurations with multiple doors: each door needs its own floor guide. If a door travels more than a single door width, consider whether multiple T guides or a continuous floor guide is the right solution for the full travel distance.
What not to do
- Don't skip installation. The floor guide is required, not optional. A barn door without a floor guide is hanging from the top with nothing constraining the bottom — it will swing. This is the most common reason customers contact us about a swinging door after installation.
- Don't lubricate the floor guide. Oil-based lubricants attract dust and debris, which builds up in the guide channel and creates more friction than the dry guide produces. Keep the guide clean with a dry cloth — that's the correct maintenance approach.
- Don't overtighten a wheeled guide. A wheeled guide that's too tight against the door creates drag on every slide. Position for light compression — enough to prevent sway, not so much that it resists the door's movement.
- Don't position the guide to fight the door. The guide should work with the door's natural hang position, not pull it to a different position. A guide fighting the door's natural hang creates noise, friction, and wear.
Common floor guide questions
Do you need a floor guide for a barn door? Yes. Every kit we sell includes one, and it's required on every install. The track holds the door only at the top, so without a guide the bottom is free to swing away from the wall.
Can you install a barn door without a floor guide? You can hang the door, but you shouldn't run it that way. An unguided door swings on every pass, scrapes the wall or frame, and forces the top rollers and track to absorb side loads they aren't built for — which shortens hardware life. It's the most common reason customers contact us about a door that swings after installation.
Why is my floor guide noisy, and should I lubricate it? Don't lubricate it. A noisy guide is almost always debris in the channel or a guide fighting the door's natural hang — not a lubrication problem. Wipe the channel with a dry cloth, then loosen the guide, let the closed door settle where it wants to sit, and retighten there. If rattle is the issue, a wheeled guide makes continuous contact and runs quieter than a T guide.
Can a floor guide be adjusted after it's installed? Yes. Loosen the mounting screws, slide the door to find where it naturally hangs, and retighten there. Several of our U-style guides also adjust to fit different door thicknesses.
Not sure which floor guide is right for your installation?
Email us at info@thebarndoorhardwarestore.com with your flooring type, door weight, and travel distance. We'll confirm the right guide before anything ships. Available 7 days a week.
