
You've probably seen those beautiful barn doors gliding effortlessly across a wall and wondered what makes them work so smoothly. The truth is, the magic lies in understanding the individual sliding door components that work together as a precisely engineered system. Whether you're planning your first installation or troubleshooting an existing setup, knowing these parts inside and out can mean the difference between a door that glides like butter and one that sticks, squeaks, or worse, comes off the track. Let me walk you through everything you need to know about these essential components.
Understanding the Track System
The track is the backbone of any sliding door setup. Think of it as the highway your door travels on, and just like a real highway, quality matters immensely.
Track Materials and Their Impact
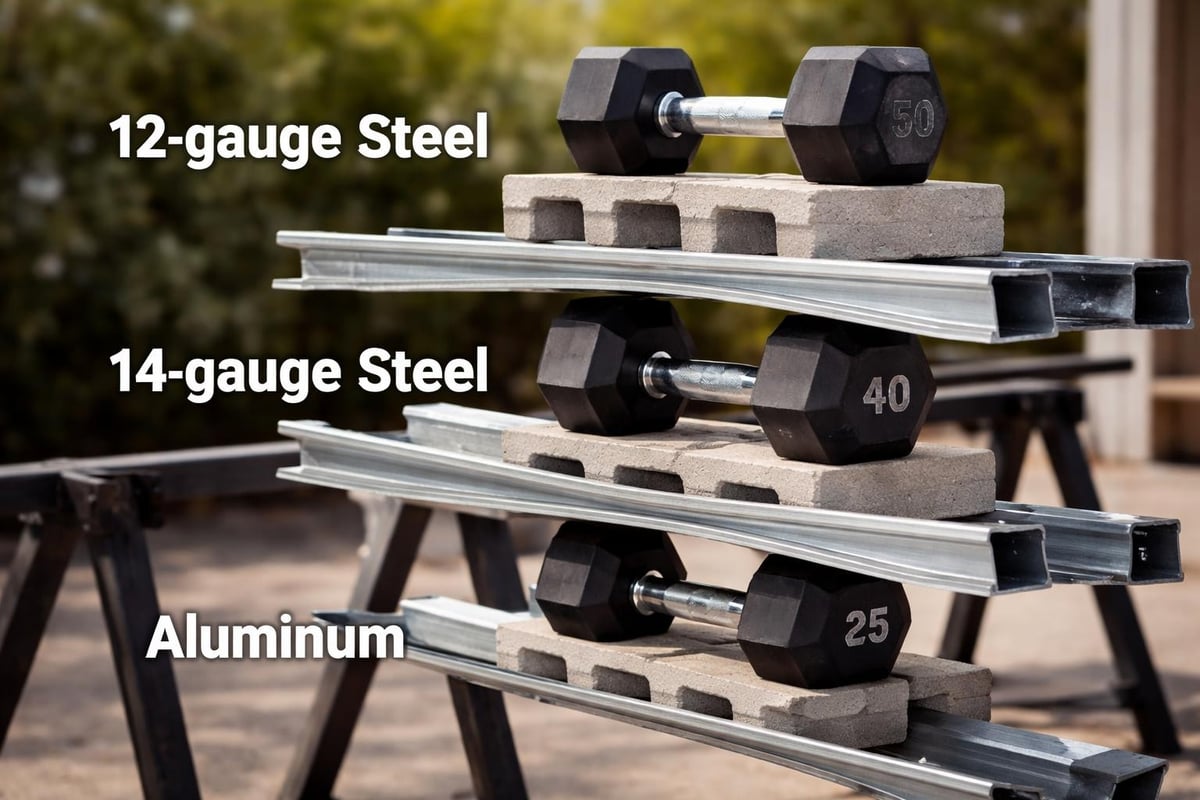
Most barn door tracks come in either steel or aluminum. Steel tracks offer superior strength and can handle heavier doors, typically supporting 200 pounds or more. Aluminum tracks, while lighter, work perfectly for standard residential doors and resist corrosion better in humid environments.
I remember a customer from Nashville who installed a reclaimed wood door weighing about 180 pounds. She initially chose an aluminum track to save money, but after a month of operation, the track started to bow slightly. We upgraded her to a steel track, and five years later, it's still working perfectly. That experience really drives home how critical material selection is for sliding door hardware.
Track thickness also matters. A quality track should be at least 12-gauge steel (about 0.1046 inches thick) for residential applications. Anything thinner risks warping under sustained load.
The Critical Role of Rollers and Hangers
Your door could have the finest track in the world, but without proper rollers, it's going nowhere. These sliding door components are where the rubber literally meets the road.
Roller Wheel Design
Most systems use steel ball-bearing rollers, which provide smooth, quiet operation. The bearing quality determines how your door performs years down the line. Sealed bearings keep dust and debris out, extending the life of your system significantly.
Here's what sets quality rollers apart:
- Bearing type: Sealed ball bearings vs. nylon bushings
- Wheel diameter: Larger wheels (1.5" to 2") roll more smoothly over track imperfections
- Wheel material: Steel wheels last longer but can be noisier; nylon wheels run quieter
- Weight capacity: Each roller should handle at least half your door's weight with safety margin
Hanger Configurations
The hangers connect your door to the rollers, and their design affects both functionality and aesthetics. J-strap hangers, named for their distinctive curved shape, offer a traditional farmhouse look while providing strong support. Flat hangers create a more contemporary appearance, sitting flush against your door.
Door Panel Mounting Hardware
Getting your door properly mounted involves more than just screwing some brackets into place. These sliding door components require careful consideration based on your door type and weight.
Mounting Brackets and Spacers
You'll need standoff brackets that position the track the correct distance from your wall. This spacing typically ranges from 2 to 4 inches, depending on your door thickness and any trim or obstacles.
| Bracket Type | Wall Clearance | Best For | Load Rating |
|---|---|---|---|
| Standard Standoff | 2-2.5 inches | Smooth walls | 200 lbs |
| Extended Standoff | 3-4 inches | Walls with trim | 200 lbs |
| Ceiling Mount | Varies | Low headers | 250 lbs |
| Fascia Mount | Custom | Decorative covers | 300 lbs |
A contractor I know in Austin once installed a barn door for a client without accounting for the baseboards that extended 3/4 inch from the wall. The door couldn't slide smoothly, and they had to redo the entire installation with extended standoffs. Measure twice, install once, as they say.
Floor Guides: The Unsung Heroes
While the track and rollers get all the attention, floor guides are essential sliding door components that keep your door aligned and prevent swaying. Think of them as the guardrails on that highway we talked about earlier.
Types of Floor Guides
Wall-mount guides attach to the baseboard and use a small wheel or pin to keep the door bottom aligned. They're nearly invisible and work great for lighter doors.
Floor-mount guides sit directly on the floor beneath the door. These provide more substantial support for heavier doors and work better when you don't have a suitable baseboard for mounting.
Adjustable guides offer flexibility for doors that might shift slightly over time. You can fine-tune the alignment without tools.
The floor guides collection offers various options depending on your specific installation needs.
Handles and Pull Hardware
You need a way to actually move your door, right? Handles are functional sliding door components that also serve as major design elements.
Handle Style Considerations
Barn door handles come in several configurations:
- Traditional pull handles: Mounted vertically on one side of the door
- Flush pulls: Recessed into the door for a sleek look
- Edge pulls: Attached to the door edge for minimal visual impact
- Double-sided handles: Provide grip from both sides of the door
When selecting handles, consider where you'll be standing when you open the door. A customer once installed beautiful 12-inch pulls on a pantry door, only to realize they hit the adjacent refrigerator when the door was open. We switched her to flush pulls, and the problem was solved elegantly.
The barn door handles range includes styles from rustic to contemporary, ensuring you can match any aesthetic while maintaining functionality.
Locks and Latches for Security
Privacy and security matter, especially for bedroom and bathroom installations. These sliding door components often get overlooked during planning but become crucial later.
Locking Mechanisms
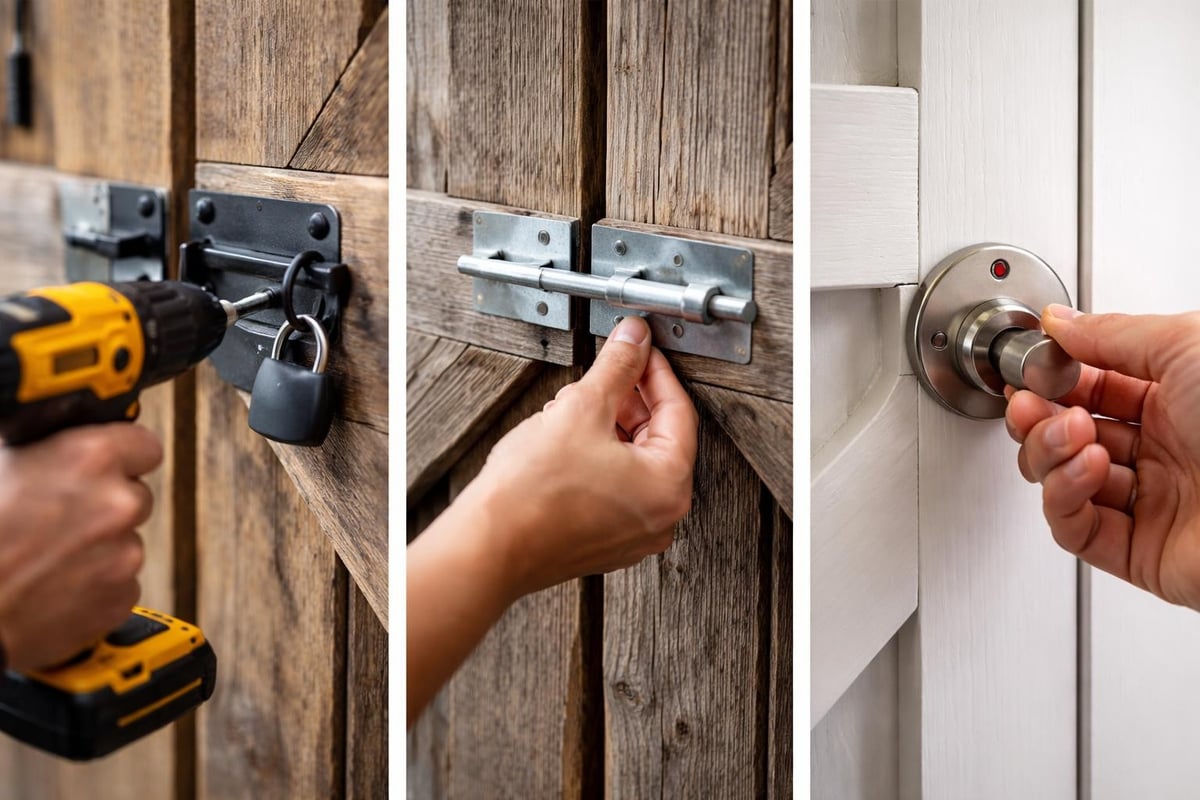
Teardrop locks are the most common, featuring a simple latch that engages a strike plate on the door frame. They're easy to install and operate.
Barrel bolts mount on the door edge and slide into a receiving bracket. They're extremely secure but require reaching to the top or bottom of the door.
Privacy locks work similar to bathroom door locks, with a twist mechanism that doesn't require a key. Perfect for bedrooms and bathrooms where you need privacy but not high security.
Stops and Bumpers
Your door needs to know where to stop. Without proper stops, you'll have drywall damage, loud bangs, and frustrated household members.
Stop Types and Placement
Track-mounted stops clamp onto the track at predetermined points, creating a physical barrier the roller can't pass.
Wall-mounted bumpers attach to the wall where the door reaches its end point, cushioning the impact.
Soft-close mechanisms use hydraulic dampening to slow the door as it approaches the stop, creating a gentle, quiet close.
I installed track-mounted stops on my own laundry room door, but I positioned them slightly too far apart. The door could slide past the door frame opening by about an inch on each side, which looked sloppy. After adjusting them inward by just that inch, the door stops perfectly aligned with the frame edges. Such a small adjustment made a huge visual difference.
Track Mounting Hardware and Wall Anchors
The strongest sliding door components in the world won't help if they pull out of your wall. Proper mounting is absolutely critical.
Mounting to Different Wall Types
Wood studs are ideal. Use 3-inch lag screws with washers, ensuring you hit the center of the stud for maximum hold.
Drywall installations require serious backing. Either add a solid wood header board (a 1x4 or 1x6 running the track length), or use heavy-duty toggle bolts rated for your door's weight.
Concrete or brick walls need masonry anchors and a hammer drill. These installations are rock-solid once complete but require more time and specialized tools.
Metal studs present the biggest challenge. You'll definitely need a header board spanning multiple studs, as metal studs alone can't support the lateral forces from a sliding door.
A builder friend shared a horror story about a DIYer who mounted a 200-pound door to drywall with plastic anchors. The entire system crashed down in the middle of the night. Fortunately, nobody was hurt, but it destroyed both the door and damaged the wall severely. Always over-engineer your mounting rather than under-doing it.
Specialty Components for Different Configurations
Not all barn doors slide the same way. Different installation types require specific sliding door components beyond the basics.
Bypass Door Components
Bypass systems, where two doors pass each other on parallel tracks, need double tracks, hangers with offset mounting, and specialized spacing hardware. The bypass hardware kits include everything needed for these more complex installations.
Bifold Components
Bifold barn doors fold in the middle as they slide, requiring hinges between panels, specialized hanger brackets, and coordinated floor guides. These systems save space in tight areas like closets and pantries.
For a closer look at how these components work together, this detailed guide breaks down the selection process based on your specific door configuration.
Maintenance Components and Replacement Parts
Even the best sliding door components eventually need maintenance or replacement. Knowing what to stock can save you headaches down the road.
Common Wear Items
Roller wheels typically need replacement every 5-10 years depending on use frequency. Keep a spare set on hand if your doors see heavy daily traffic.
Floor guide wheels wear down faster on textured flooring. Inspect them annually and replace when you notice the door starting to wobble.
Track cleanliness matters more than you'd think. Dust, pet hair, and debris accumulate in the track channel, increasing friction and wear. A monthly wipe-down with a dry cloth keeps everything running smoothly.
Finding replacement parts becomes much easier when you know your hardware manufacturer and model number. Take photos of your components and keep the original packaging or documentation.
Installation Accessories That Make Life Easier
Beyond the essential sliding door components, certain accessories transform difficult installations into manageable projects.
Tools and Helper Hardware
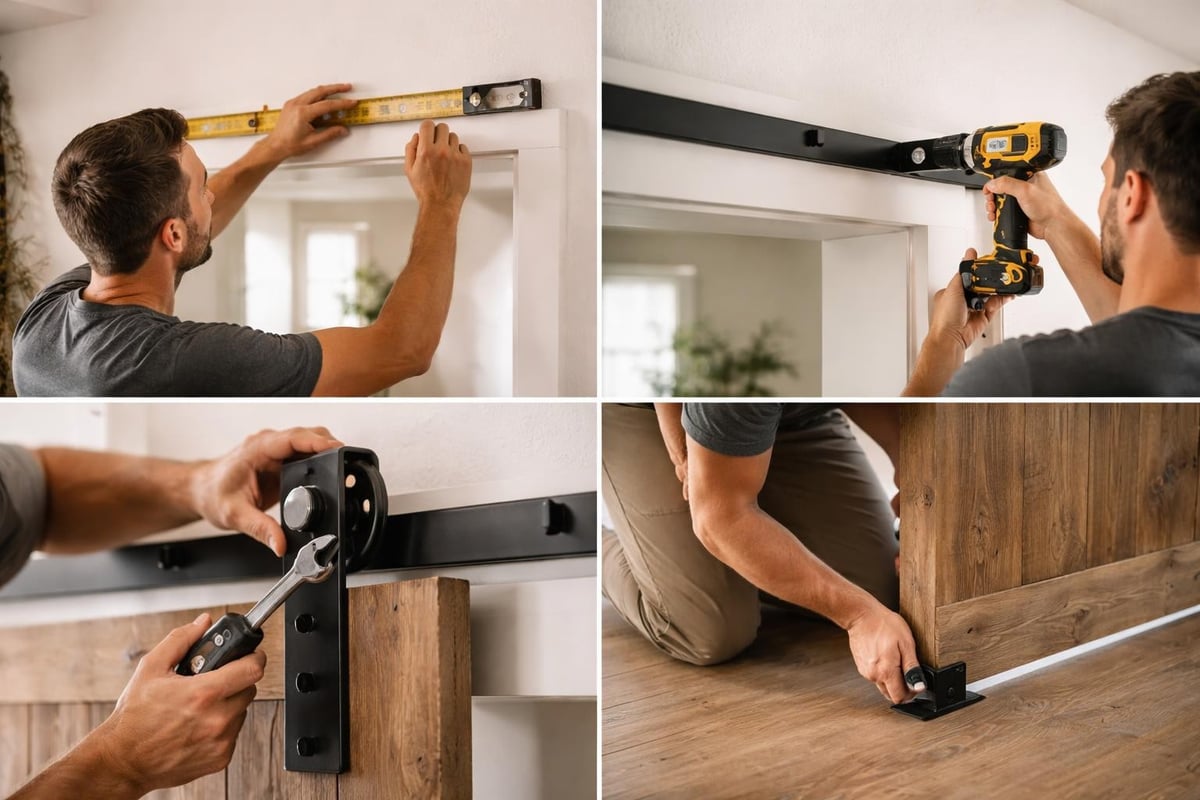
Installation jigs help maintain consistent spacing when mounting brackets. They're especially valuable for tracks longer than 6 feet.
Level guides attach temporarily to your track during installation, ensuring perfect horizontal alignment before you commit with screws.
Drill bit guides prevent your drill from skating across smooth surfaces when starting pilot holes.
Touch-up markers in finishes matching your hardware help hide minor scratches that occur during installation.
I've learned that spending an extra $30 on quality installation accessories saves hours of frustration and prevents costly mistakes. The accessories collection includes these helper items that professional installers swear by.
Choosing Components for Your Project
With all these sliding door components available, how do you actually choose the right ones? Let me share a framework that's served me well.
The Decision Matrix
Start with your door specifications:
- Weight: This determines track gauge and roller capacity
- Thickness: Affects hanger type and standoff depth
- Width: Determines track length and number of mounting brackets
- Height: Influences handle placement and whether you need anti-jump blocks
Then consider your environment:
- Humidity levels: Steel vs. stainless steel vs. aluminum
- Traffic frequency: Commercial-grade vs. residential components
- Privacy needs: Lock type and sound dampening requirements
- Aesthetic preferences: Exposed vs. hidden hardware, finish options
For instance, a bathroom door needs moisture-resistant finishes, a privacy lock, and possibly soft-close mechanisms to prevent slamming. A pantry door might prioritize smooth operation and simple pulls without locks. A bedroom door falls somewhere between, needing privacy but not necessarily moisture resistance.
Hardware Finish Options and Durability
The finish on your sliding door components affects both appearance and longevity. Let's break down your options.
Popular Finish Types
| Finish | Durability | Maintenance | Best Applications | Cost Factor |
|---|---|---|---|---|
| Black Powder Coat | Excellent | Low | Modern, industrial styles | Mid |
| Oil-Rubbed Bronze | Good | Medium | Traditional, farmhouse | Mid-High |
| Satin Nickel | Excellent | Low | Contemporary, transitional | Mid |
| Stainless Steel | Superior | Very Low | High-humidity areas | High |
| Raw Steel | Fair | High (requires sealing) | Industrial, DIY finishing | Low |
A friend installed raw steel hardware planning to apply a custom patina finish. She got busy with other projects and left it unsealed for three months. In her humid coastal climate, surface rust started forming. We salvaged it with wire brushing and immediate sealing, but she learned the importance of finishing raw components quickly.
The stainless steel collection offers the ultimate durability for demanding environments, though at a premium price point.
Understanding Weight Ratings and Safety Factors
Never exceed the weight ratings on your sliding door components. But how do those ratings actually work?
Safety Margin Calculations
Manufacturers test components to failure, then rate them at a percentage of that failure point. A 200-pound rated track might actually hold 400-500 pounds before catastrophic failure, but you should never test those limits.
Calculate your total system weight:
- Weigh your door panel (or calculate: width × height × thickness × wood density)
- Add hardware weight (usually 10-15 pounds for a complete kit)
- Add 20% safety margin for dynamic loads (opening/closing forces)
- Select components rated above that total
A real example: A customer wanted to hang a 3' × 8' door made from reclaimed 2-inch oak planks. Oak weighs about 47 pounds per cubic foot. His calculation: 3 × 8 × (2/12) × 47 = 188 pounds for the door, plus 12 pounds of hardware, plus 20% = 240 pounds total. We recommended components rated for 300 pounds to ensure longevity.
Modern Component Innovations
The sliding door component industry hasn't stood still. Recent innovations have made barn doors quieter, smoother, and easier to install than ever before.
Recent Technological Improvements
Soft-close adapters now retrofit onto existing systems, adding hydraulic dampening without replacing everything.
Self-lubricating roller bearings use sealed grease reservoirs that last the life of the component, eliminating maintenance.
Quick-mount brackets feature keyhole slots that let you hang the track without help, then slide it horizontally for precise positioning before tightening.
Adjustable-height hangers let you fine-tune door level after installation, compensating for floors that aren't perfectly level.
The Classic J-Strap Barn Door Hardware Kit represents the evolution of barn door hardware, combining traditional aesthetics with modern engineering. This American-made system supports doors up to 200 pounds with ball-bearing rollers that glide effortlessly, making it an excellent choice for both new installations and upgrades.

Component Compatibility Across Brands
What happens when you need to replace just one component but can't find the exact original? Understanding compatibility helps you mix and match when necessary.
Universal vs. Proprietary Components
Track dimensions follow industry standards. Most barn door tracks measure 1.5 inches tall with similar channel profiles, making track-to-roller compatibility fairly universal.
Hanger mounting holes vary more. Measure the spacing between mounting holes on your door before ordering replacement hangers.
Floor guides are generally universal, though you'll want to match the style (wall-mount vs. floor-mount) to your original installation.
Handles and locks are the most interchangeable components, as they mount independently from the sliding mechanism.
That said, mixing component finishes rarely looks intentional. If you're replacing visible parts, try to match both the finish and manufacturer for visual consistency.
For a comprehensive visual guide to identifying specific sliding door components, the detailed breakdown from International Association of Certified Home Inspectors helps with part identification.
Professional Installation vs. DIY
Should you install sliding door components yourself or hire a professional? The honest answer depends on your specific situation.
When to DIY
You can likely handle the installation yourself if:
- You're mounting to wood studs that you can locate reliably
- Your door weighs under 150 pounds
- You have basic tools (drill, level, stud finder, measuring tape)
- You're comfortable with power tools and following detailed instructions
- You have a helper for lifting and positioning the door
When to Call a Professional
Consider hiring help if:
- You're mounting to concrete, brick, or metal studs
- Your door exceeds 200 pounds or 8 feet tall
- You're installing bypass or bifold systems with complex configurations
- Your installation requires cutting tracks or custom modifications
- You're working with expensive custom doors you can't risk damaging
The complete hardware kits include detailed instructions that walk you through each step, making DIY installation more accessible than ever.
Planning Your Component Order
Nothing's worse than getting halfway through an installation and realizing you're missing critical sliding door components. Here's how to plan your order comprehensively.
Complete Order Checklist
Core sliding mechanism:
- Track (measure opening width plus door width, then add 6 inches)
- Rollers/hangers (typically 2 per door)
- Wall-mount brackets (every 16-24 inches along track length)
- Lag screws or appropriate anchors for your wall type
Door guidance:
- Floor guide (1 per door minimum)
- Door stops (2 per track)
- Anti-jump blocks if track is ceiling-height
Operational hardware:
- Handle or pull (consider whether you need single or double-sided)
- Lock or latch if desired
- Bumpers or soft-close mechanisms
Installation aids:
- Drill bits (appropriate for your wall material)
- Level
- Measuring tape
- Pencil or marker
- Safety glasses
I always recommend ordering one extra roller hanger assembly and a spare floor guide wheel. These components occasionally arrive damaged in shipping, and having spares means you don't delay your project waiting for replacements.
Understanding sliding door components transforms what seems like a complex system into a collection of logical, purposeful parts working in harmony. Whether you're installing a single barn door in your home or planning a whole-house renovation, quality components make all the difference in performance and longevity. Since 2016, The Barn Door Hardware Store has helped thousands of homeowners and contractors select the perfect components for their projects, backed by expert support, free shipping, and a limited lifetime warranty that ensures your investment stands the test of time.
